All Escape Academy 2 Back 2 School guides
Chapter 7 is a memorial for Von Bellini: you collect a song, a portrait and a wreath from three campuses, finish the last collectibles, then open The Third Chamber and ride the mine carts in Off the Rails. If you’re hunting the collectible achievements, this is where Red Herrings, Quanty, ziplines and Extra Credits all wrap up.
Chapter 7: Von But Not Forgotten, The Third Chamber and Off the Rails
Go to the Quad and talk to the professors lined up by the gazebo.
Music Studio
The Music Studio is the first building on the right when you enter the Arts Campus from the Quad. Go right for a Red Herring (45/50). Turn around for 1 Escape Buck behind the lamp on the table behind Professor Chortkoff. Talk to her, then take the Jazz Invitation and The Drummer’s Lament from the tables behind you.
- Piano: challenge JP Jonesin. He plays a few notes and you play the next one, three times. If you don’t read music, compare the notes on the piano with the sheet on the right. The answers are E, D, ECG.
- Drums: pin The Drummer’s Lament and hit snare, snare, bass drum, crash cymbal, floor tom.
- Trombone: pin the Jazz Invitation. Sliding the trombone left and right reveals symbols. Reveal them in this order: circle, pentagon, square, triangle, hexagon. It sometimes fails to register even with the right order, so start over from the first symbol if it does.
- Singer: talk to the woman at the mic and pay her.
Report to Chortkoff. Before you leave, take the Red Herring (46/50) from the back of the piano.
Arts Studio
Climb to the top of the Upper Arts Campus and go into the Arts Classroom, left of the statue. Talk to Professor Slip, then check his office on the left for a Red Herring (47/50). Back in the classroom, there’s 1 Escape Buck in the brown box on the shelf above the sink.
On one table, the “Spinning Stencil: Line ’em up and color!” sheet comes with colored pencils. Spin the stencil until the lines connect into a picture and color it in: it’s a LION, the code for the Paint Supplies on the right. Take the Shapes Stencil.
Put the Shapes Stencil on the palette in the Painting suitcase on the other table. Order the shapes from fewest edges to most, mix the colors inside each one and press the result:
| Shape | Colors | Press |
|---|---|---|
| Balloon shape | Red + white | Pink |
| Half circle | Blue | Blue |
| Triangle | Blue + yellow | Green |
| Square | Red | Red |
| Pentagon | Yellow + red | Orange |
Take the Key and open the Stencils locker for Stencils A to D.
In the pottery area, take 1 Escape Buck from the basket under the fruit painting. Shape your pot to continue the pattern of the sculptures, then count its stars, twirls and moons:
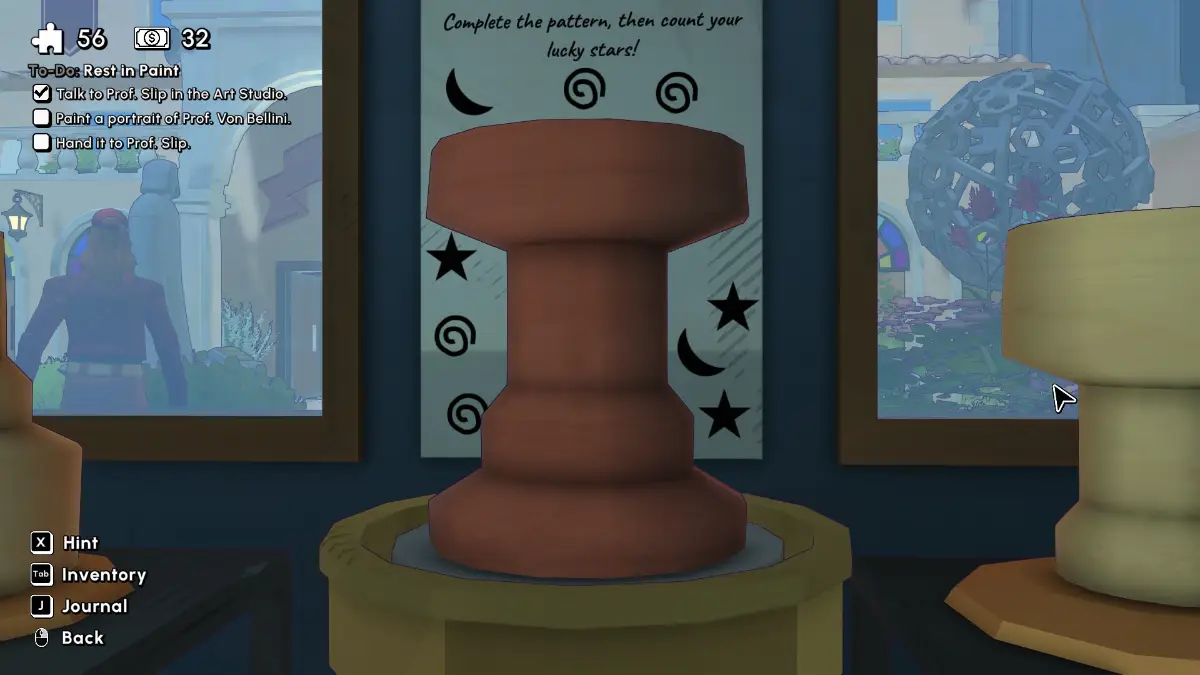
Enter 3 stars, 4 twirls, 2 moons on the cupboard at the back and take the Spray Paint. Spray the blank canvas next to Slip, add Stencils A to D to make the Portrait of Prof. Von Bellini, and report to him.
Humanities Campus
The last stop is the Cipher Center in the part of the Humanities Campus you haven’t explored yet. It’s also where most of the remaining collectibles are.
From the Lecture Hall, take the door toward the Greenhouse. Turn right toward the Garden path and take 1 Escape Buck from the tree by the door, but don’t go into the Garden. North of the two arguing students, a Red Herring (48/50) is disguised as a flower in the flower bed.
Skip the Greenhouse for now. Climb the bricks on the wall to its left, cross the solar panels to the Greenhouse’s upper door and take 1 Escape Buck. Back by the bricks, set up the last zipline (10/10) for Just Here For The Ziplines.
 | Just Here For the Ziplines Unlock every zipline on campus. |
Before you enter the nearby alley, jump on the pipes for 1 Escape Buck above the outdoor unit. Follow the alley to a pillar behind the Cipher Center: a Red Herring (49/50) is on one of its sides. Keep going to the stairs, climb to the top and take the Red Herring (50/50) from the crates, plus 1 Escape Buck from the crate on the other side.
Turning In the Red Herrings
Extra Credit: Hook, Line, and Thinker
Go to the Quad now and hand your fish to the Fishing Club student to finish Hook, Line, and Thinker (5 Escape Bucks for each step), Herring Is Caring. Escape-a-holic unlocks once every Extra Credit is done, including Breaking Clues! and Montecluema’s Revenge below. There are two extra herrings later in this chapter. If you turn in after collecting all 52, he takes all of them, so turn in at 50.
 | Herring Is Caring Turn in all 50 Red Herrings to Cod Stewart. |
The Escapist Times
Back in the Humanities Campus, go into The Escapist Times. One window by the entrance has 1 Escape Buck, and the other has the last Quanty (11/11) for Quanty Superposition. There’s 1 Escape Buck on the shelf by the board.
 | Quanty Superposition Meet all 11 versions of Quanty across campus. |
Extra Credit: Breaking Clues!
The student at the back gives Breaking Clues!: three people ate the cookies. The desks are laid out like this:
| Dally | Jules | Aber | Esther | Cheryl |
| Frank | Lila | Grace | Phillip | Hellen |
Their statements:
- Dally: two of the crooks sit directly across from each other.
- Jules: she was out sick on the day of the theft.
- Aber: he saw Esther looking up how to open jars, and not for a story.
- Esther: one of the crooks sits right next to her.
- Cheryl: Lila made cookies she could eat, so she usually gives hers away.
- Frank: Jules can confirm he was at his desk all day.
- Lila: she made them gluten-free for Cheryl, the only one with an allergy.
- Grace: one of the crooks sits at a corner desk.
- Phillip: he’s allergic to pecans, so why would he want them?
- Hellen: there were enough cookies for everyone plus one, since Jules was out.
Accuse Frank, Esther and Phillip on the board for 5 Escape Bucks.
Cipher Center
Talk to Professor Jeberson. Go halfway up the stairs and jump across the cabinets to the top of the one by the Invisible Ink Reveal-atron 8000 for 1 Escape Buck. Upstairs, one of the trays holds a Red Herring (the first extra, 51). From up there you can spot 1 Escape Buck on top of a cabinet on the first floor.
Extra Credit: Montecluema’s Revenge
The student on the second floor gives Montecluema’s Revenge. The back of the puzzle shows four colors (purple, yellow, green, cyan): slide the beads on the front to match. It can be buggy, so reset and retry if it won’t accept a correct answer. The reward is 10 Escape Bucks.
 | Escape-a-holic Complete all Extra Credit quests. |
On the first floor, pin the Music Notation Key from the table by the box. Every measure has to add up to one whole note:
- Top left: half note (hollow ♩)
- Top right: quarter note (♩)
- Bottom left: eighth note (♪)
- Bottom right: whole note (o)
Take the Unmarked Diagram, put it in the Reveal-atron next to Jeberson and pull the lever for the Guitar Strum Chart. Pin it. On the “Give me a CHORD” side of the box, the chart is just an alphabet, so press C-H-O-R-D in this order:
| . | ||||
| 4 | ||||
| 1 | 3 | |||
| 5 | 2 |
Hit Strum on the left and take the Encrypted Note. Feed it into the Decrypt-O-Matic 6000 behind you and pull Start. Pin the Notes Note. On the music side of the box, set the first note in the middle and follow the plus and minus counts: B, F, C, D, A, E. Take the Marbles.
On the last side of the box, drop the Marbles in so each lands on a different note, using the notes from the step before:
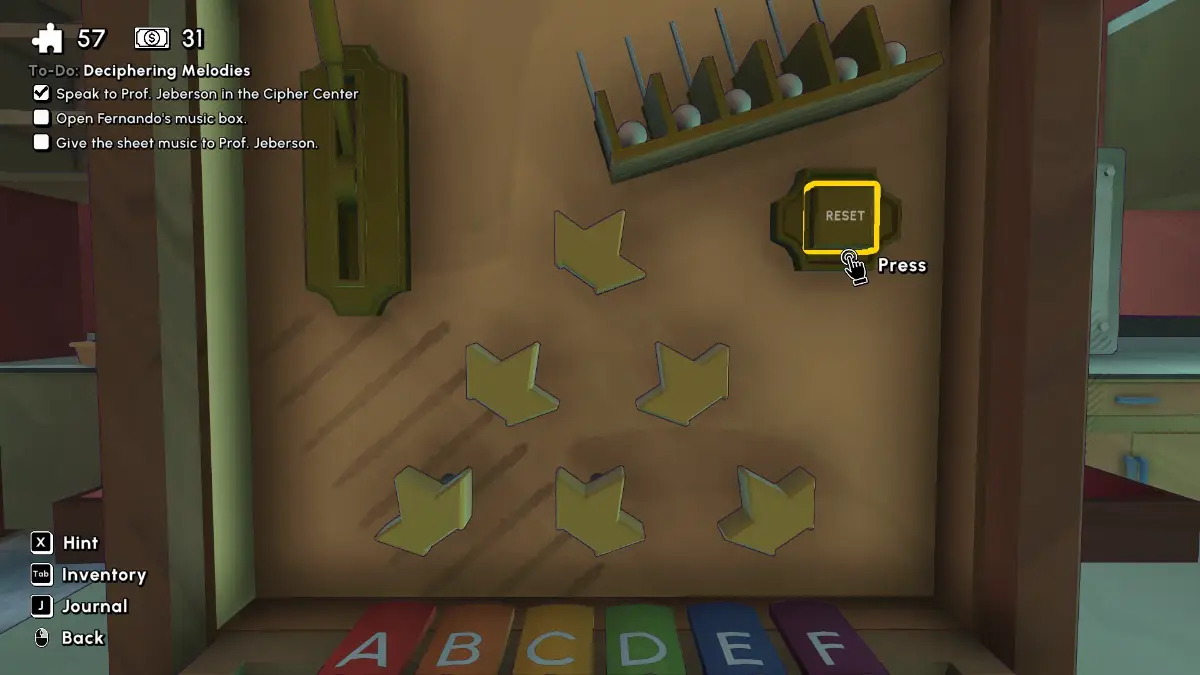
Give the Alma Mater Sheet Music to Jeberson.
Greenhouse
Talk to Professor Bonilla. There’s 1 Escape Buck by the plants in front of the chair that faces the empty flower bed.
The vine wall near the Rest in Puzzles puzzle has flowers on it, and the Fertilizers on the left show color orders from bottom to top. Find the vines with each color order and read their symbols, top to bottom: square, triangle, heart, triangle. Take the Escapist’s Hedge and use it on the Cluebells, Popkeys and Lockscombs flower bed. Pick five of each.
At Rest in Puzzles, arrange the flowers to match the poem on the left. There are five spots for five lines, so some flowers carry over from one line to the next. Left to right: Cluebells, Cluebells, Lockscombs, Popkeys, Popkeys. Give the Memorial Wreath to Bonilla.
Go to the stage in the Campus Gardens by the door to the Quad and talk to Chortkoff to finish Von But Not Forgotten.
 | Von But Not Forgotten Complete “Von But Not Forgotten” |
Finding the Third Chamber
Back in the Humanities Campus, open the door in the middle of the campus. Water runs around the outside of this area past the locked doors and under the stairs. Under the stairs to the Greenhouse, in the tunnel marked with a sun, is the second extra Red Herring (52).
Talk to Kira in the center and equip The Founder’s Eyes. The fountain has footprints leading from its number lock, plus one extra trail. Follow the extra trail into the alley and upstairs to a statue. There’s no clue for this one, but the phrase is a common one: HISTORY. Take the Stone Tablet and pin it.
Go back to the fountain and follow each numbered trail to a colored symbol. Use the Stone Tablet to turn symbols and colors into numbers, then do the math. Standing on the long pool that leads to the fountain:
- Top left: two eyes, moon, yellow: 4 − 3 + 2 = 3
- Top right: sun, green: 3 + 2 + 3 = 8
- Bottom left: three stars, yellow: 1 + 1 + 1 + 2 = 5
- Bottom right: one eye, key, red: 2 − 1 + 1 = 2
The Third Chamber
Solve the sliding puzzle on the left. Each founder in the finished picture points at something. Using the founders’ suit symbols:
- Spade: 5
- Heart: 7
- Club: A
- Diamond: 3
The chest on the right takes 57A3. Take Judgement, the Custodian Complaint and the Lighter.
Light the candles on both sides of the room and note which go out first and what’s written under them:
- Left: Palm, Bee, Whale
- Right: Sheep, Beef, Palm
The chest on the right needs five symbols. Join the two sequences on the shared symbol, Palm: Sheep, Beef (cow), Palm, Bee, Whale. Take the Newspaper, Obituary and Travel Map.
The floor in the middle has letters with key and lock symbols, and every window shows either a key or a lock. Find the broken windows and turn their positions into letters from the floor:
- Top left: I
- Top right: T
- Bottom left: M
- Bottom right: E
The left chest takes TIME. Take both Machina Extractio pages and fill in the statue:
“Alistair built a strange machine. He sat in one seat with a Student in the other. The device Stole his subject’s Youth. Alistair’s sudden Transformation was evil. (All four from Machina Extractio.) We had no choice but to Jail him. Then we Memory Gassed him (both from Judgement) and The Student Body (Custodian Complaint). Fernando was horrified; he stopped Speaking and died shortly afterward of A Broken Heart (both from the Obituary). Sameer resigned and departed on the Ruddy Herring for his homeland of India (both from the Travel Map). Only Reina remained, the sole keeper of the secret.”
That gives A Well-Kept Secret.
 | A Well-Kept Secret Complete “The Third Chamber” |
Go to The Escapist Times and through the door toward the Museum: a path leads back to the Headmaster’s Tower. Talk to the headmaster in her office on the third floor. Then go to the Lobby’s second floor toward the Dorms, keep right until you reach the stairs, go down to Professor Jeberson and follow him to the Crypt.
Off the Rails
Gear Room
Pick up the five gears from the ground (XL, L, M and two S) and fit them into the machine:
- Left: S, M
- Middle: L, XL
- Right: S
Ride the cart to the next room.
Gold Panning
Go back into the big area for the Proper Pan Technique poster: pan toward the tools that start with a spark, then the ones that help you see in the dark, then the ones that break stones, then the ones that cover your head. On the plate on the nearby table, press:
- Southwest (dynamite, candle)
- Northwest (candle, miner’s hat)
- Southeast (dynamite, pickaxe)
- North (miner’s hat)
Take the four Gemstones and set each in the matching slot of the triangle on the right. Compare the lit gemstones with the lamps on the pillars along the path to the locked door where your cart is, and read off the letters:
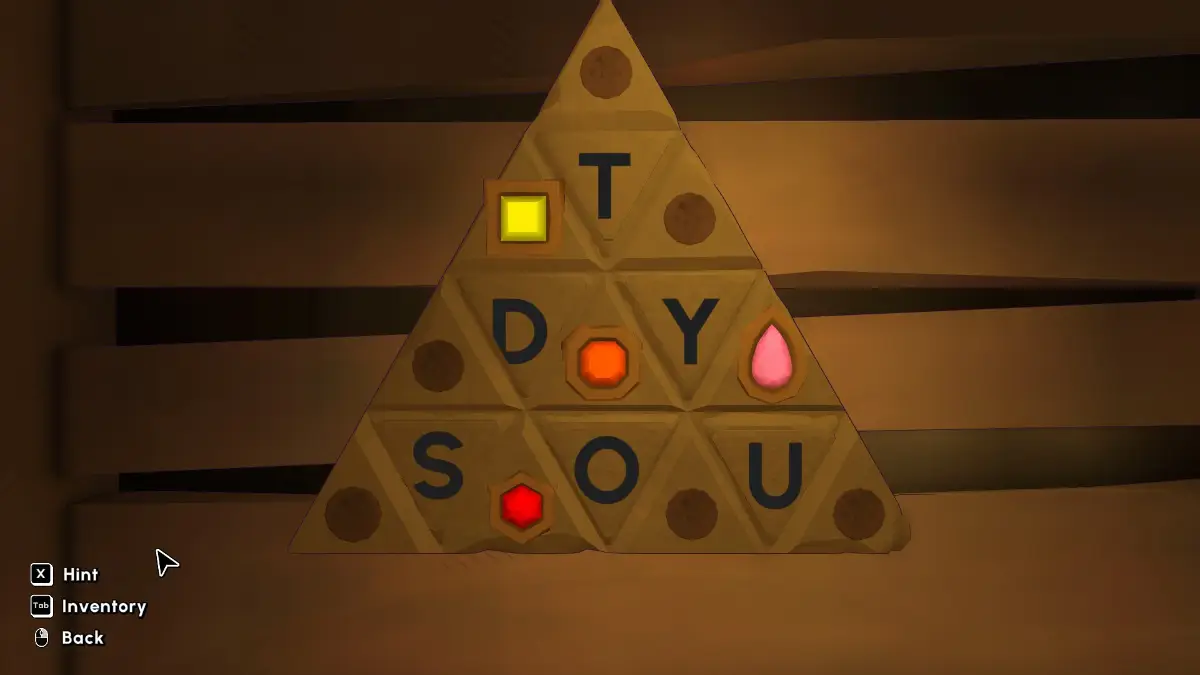
The lock takes DUSTY. Ride the cart on.
Crane Room
Check the symbol on the floor, then the crane machine. The cart has to end up on the six-triangle symbol. Connect the pipes in three steps: three circles to three triangles, then three triangles to circle-and-square, then circle-and-square to six triangles.
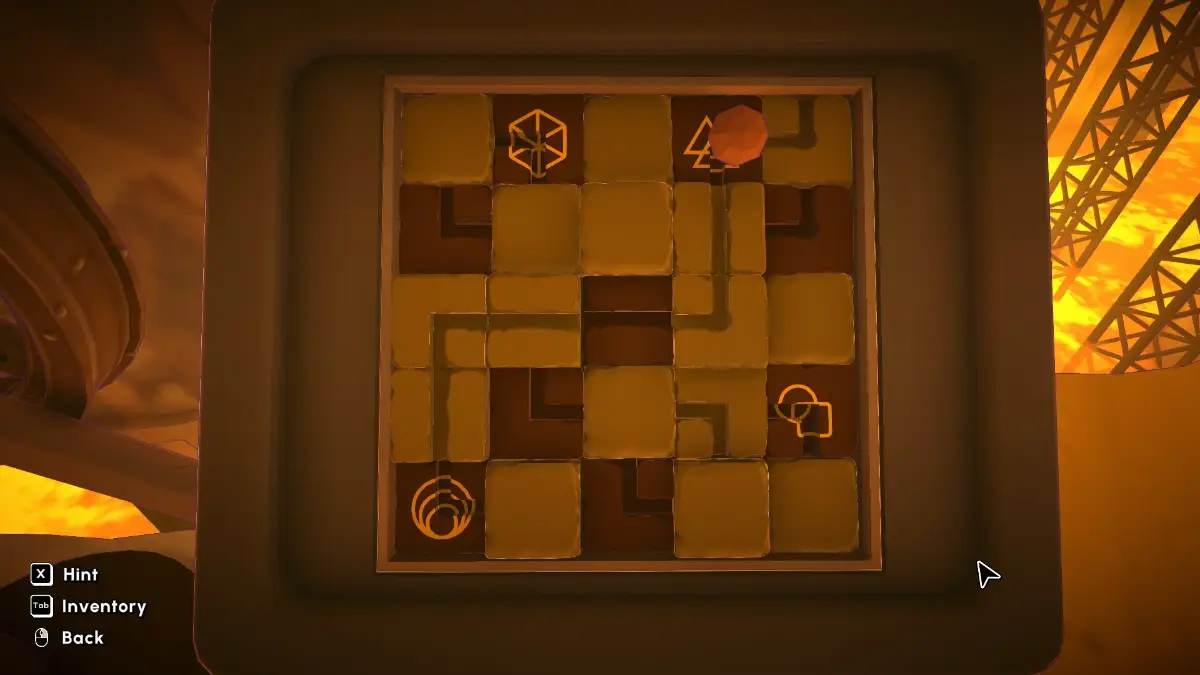
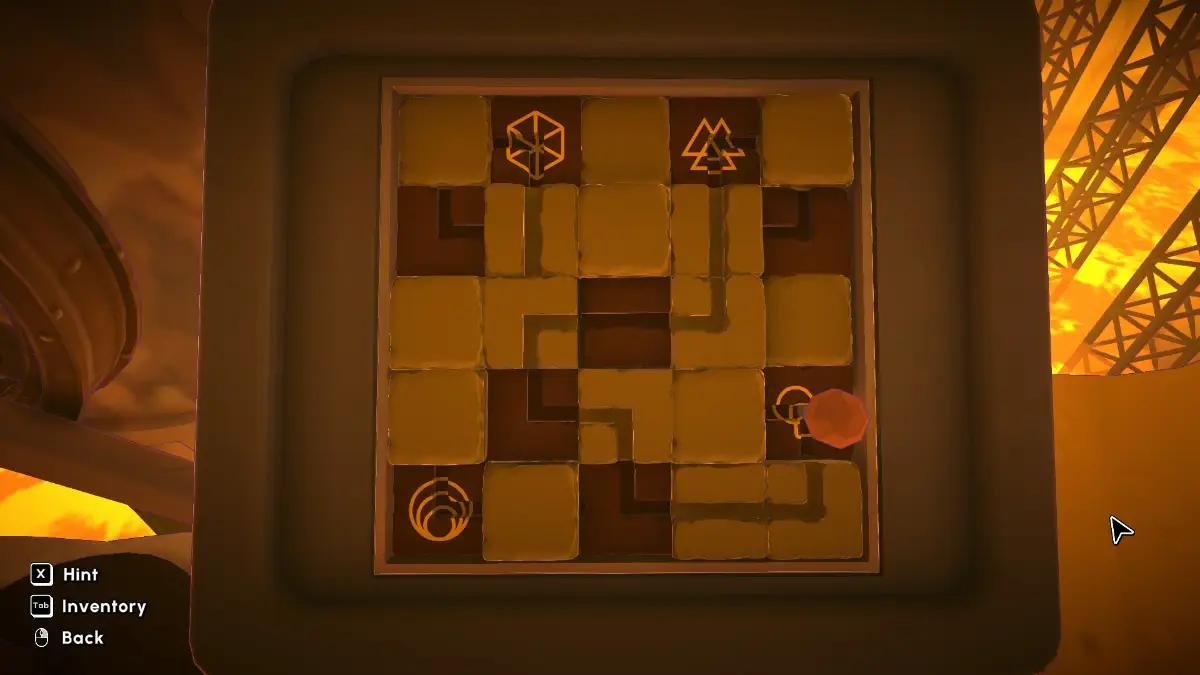
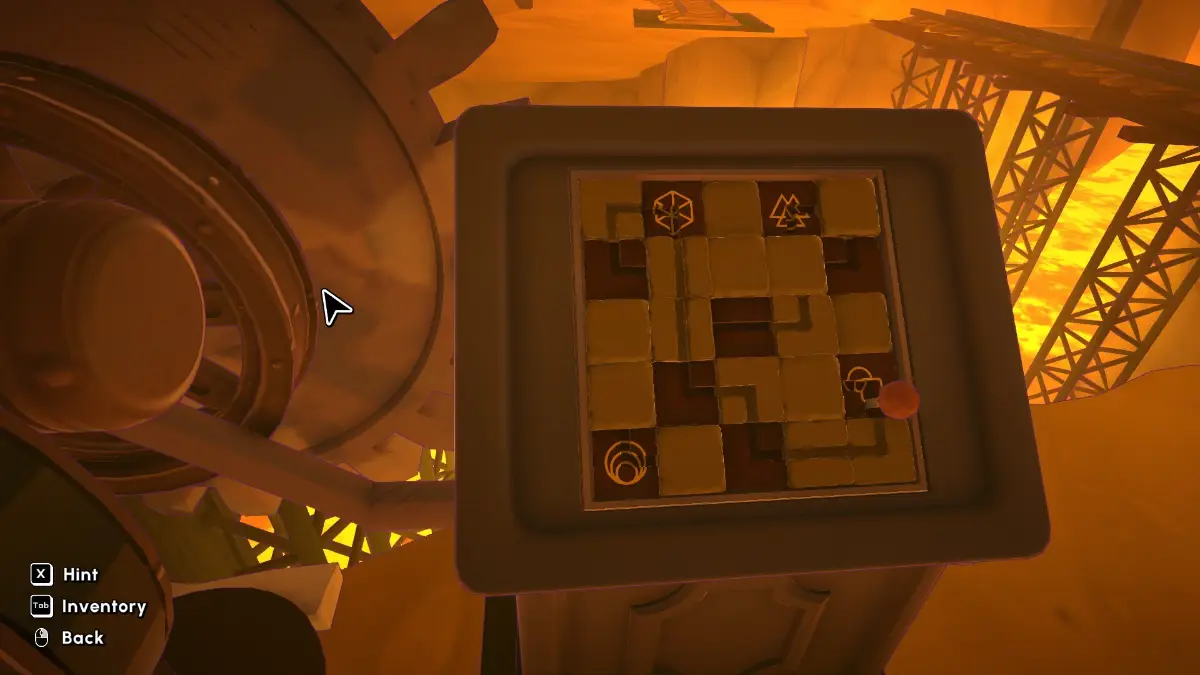
Ride the cart again.
Crash Site
Take the Old Keyring and Old Paper from the crates that broke in the crash, and use the keyring on both keyholes on the wall.
Right side first. Pin the Old Paper. Each row of the device sets one part of a shape: the base shape, then the inner pattern, then which side is flat. Build each shape from the paper and note its number:
| Shape | Base | Pattern | Flat side | Number |
|---|---|---|---|---|
| Half circle | Circle | Wavy | Right | 3 |
| Right triangle | Triangle | Triangles | Left | 2 |
| Rectangle | Square | Diagonal lines | Top | 4 |
| Half hexagon | Hexagon | Dots | Left | 1 |
The code is 3241. Take the Crest.
The left side is trickier: you open gates so the balls drop into the right spots. Pull the lever a few times to see how it behaves. Top to bottom, the gates are 2, 3, 1. Take the second Crest and put both on the wall ahead.
Each colored crystal spins to show two symbols. Each symbol stands for a line shape, and stacking the two shapes draws a digit:
| Crystal | Symbols | Shapes | Digit |
|---|---|---|---|
| Red | Hourglass, maze | Square, reverse L | 9 |
| Yellow | Eye, jigsaw | Reverse C, L | 2 |
| Blue | Eye, maze | Reverse C, reverse L | 3 |
| Green | Hourglass, key | Square, U | 8 |
The padlock at the back of the room takes 9238. Take the letter to finish Off the Rails. You get Reina Wym’s Final Words: go back to the Headmaster’s Office and talk to Headmaster Solange.
 | Off The Rails Complete “Off the Rails” |
Previous: Chapter 6 walkthrough. Next: Chapter 8 walkthrough. Every chapter is listed in the Escape Academy 2 Back 2 School walkthrough.
Based on the original walkthrough by aquatorrent.