All Escape Academy 2 Back 2 School guides
Chapter 1 covers No Ticket, A Clued Awakening and That Rings a Bell, plus your first stretch of free roam around the Headmaster’s Tower. If you’re going for every achievement, play on Classic: No Ticket is the one escape room you can’t replay later, so an A+ there has to happen on your first try.
Chapter 1: No Ticket to That Rings a Bell
Talk to everyone you meet. Anyone you haven’t spoken to yet has a dot over their head, and the 300-conversation achievement adds up faster if you clear each area as you go.
 | Extrovert Extraordinaire Have over 300 conversations with people around campus. |
No Ticket
Open the map, then check the odd device next to the ticket booth. Colored lines run into the middle of it. Place the symbol that sits between each set of colored lines onto the matching slot: triangle, gear, square.
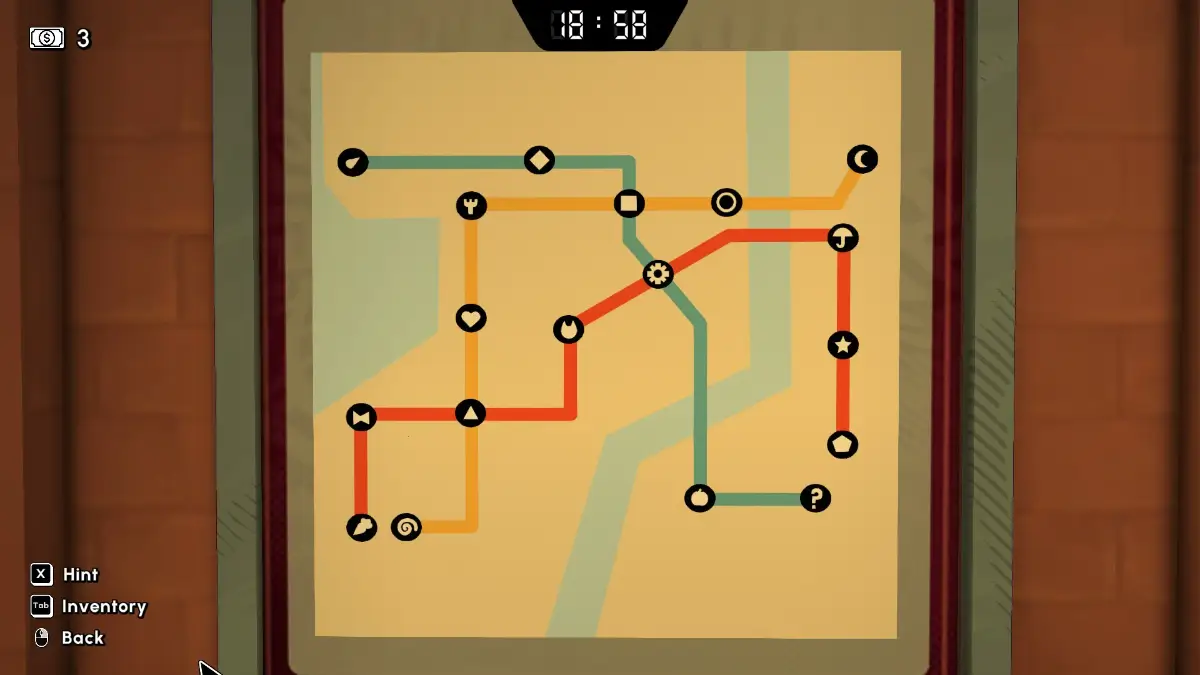
The ticket booth now asks for your destination. Escape Academy is 9625. You still need three Escape Bucks to pay:
- Next to the telephone booth
- Inside the small chute
- On top of the telephone booth
The first one unlocks Spare Some Change?. Pay at the booth, take the Tram Ticket and use it on the door.
 | Spare Some Change? Collect your first Escape Buck. |
At the train, the signs around the platform rotate between colors, and each color shows a letter. The machine by the train lists colored symbols. Turn each sign to the color the machine shows and read the letter. The lock above the symbols takes STEAM. When the train door opens, pull the lever to finish the level and get Back 2 School.
 | Back 2 School Complete “No Ticket” |
A Clued Awakening
The desk behind you has a note telling you to start at X2 Y2. The student tables are marked with coordinates, and each one gives a letter and the next move:
| Table | Letter | Next move |
|---|---|---|
| X2 Y2 | P | X+1 |
| X3 Y2 | A | Y+2 |
| X3 Y4 | T | X-2 |
| X1 Y4 | H | – |
Enter PATH on the bag near the table behind the desks and take Projector Still (3 of 3). Run it on the screen by the blackboard: it shows founder Sameer Gaspard, who is the spade on the picture by the door.
The poster on the blackboard reads “Examine your surroundings closely”. Take the key from it and open the padlock near the desk behind the student tables. That gives Projector Still (1 of 3), which shows Fernando Augustin, the club.
The board on the wall lists activities by time. In order they are coffee (8AM), karaoke (11AM), jigsaw (1PM), build (3PM) and hide and seek (9PM). Press the symbols on the machine next to it in that order: coffee, music notes, jigsaw, hammer, eye. Look through the lens to get the number 772.
Before you call it, dial 911 on the teacher’s phone for Don’t Call In Case of an Emergency. Then call 772 and take Projector Still (2 of 3). It shows Reina Wym, the heart.
 | Don’t Call In Case of an Emergency Attempt to contact the campus police. |
Enter the founders on the console by the door:
- Spade: Sameer Gaspard
- Heart: Reina Wym
- Club: Fernando Augustin
 | A Clued Awakening Complete “A Clued Awakening” |
Headmaster’s Tower
Classrooms (1F)
Talk to the headmaster and accept the orientation. You get the Locker’d and Loaded quest and a Locker Key. Find your own face on the wall of student photos (the restroom mirror helps if you’re not sure). Your number is 3517, and your locker is in the row behind that photo wall. Opening it gives Locked In and 3 Escape Bucks.
 | Locked In Complete your first assignment. |
Two of the restroom stalls have 1 Escape Buck each. You only have one puzzle piece, so take the only door it opens.
Lobby
The founder photo here shows 3 spades. Take the stairs to the right side: the plaque with a fish on your left holds a Red Herring (1/50), and the painting of a woman on your right shows 4 hearts. On the upper floor, the founder photo shows 6 clubs. There’s 1 Escape Buck on the window to the right and a Red Herring (2/50) on the bookshelf to the left. Every fish is also listed in our Red Herring locations guide.
Extra Credit: Shelf Destruction
On the far side of the upper floor, someone has knocked over trophies. Accept the Shelf Destruction Extra Credit and use the posters next to the shelf to work out the years:
- ’84: Lock trophy
- ’95: Bomb trophy (the poster shows a 5, and 95 is the only year that fits)
- ’79: Bee trophy (the first bee contest was 1955 and they took silver at the 25th, so 55 + 25 − 1 = 79)
- ’73: small T.O.P trophy
- ’83: big T.O.P trophy (they only became champions after 10 years of losing, so the older trophy is the smaller one)
You get 5 Escape Bucks and A Little Something Extra for your first Extra Credit.
 | A Little Something Extra Complete your first Extra Credit quest. |
Back on the second floor, find the door with a spade, heart and club lock. If you don’t see it, it’s on the opposite side of the room. Enter the counts from the founder photos: 3, 4, 6.
Dorms (2F)
The half-open door is your room, 3517. The laptop inside lets you replay any escape room except No Ticket. Grab the Red Herring (3/50) in the basket behind the door and 1 Escape Buck on the bench outside.
Further along, wake the student sleeping on a bench and accept Fizzness as Usual. Unlock the door to the Courtyard next to him.
Courtyard
Extra Credit: Fizzness as Usual
Buy Escapist’s Edge for $1 from the vending machine. It works like sudoku: no row or column can repeat a letter or a number. A note on one of the tables explains the rules if you want a hint. The filled grid looks like this:
| D3 | A4 | C1 | B2 |
| B1 | C2 | A3 | D4 |
| A2 | D1 | B4 | C3 |
| C4 | B3 | D2 | A1 |
The code is A4. Hand the drink over for 5 Escape Bucks.
There’s 1 Escape Buck on the table by the vending machine. Step outside the glass window onto the second-floor ledge: a table near two students standing together has another buck. Head downstairs, open the locked doors for a shortcut, and talk to the cat next to the Lobby door for Got Milk?.
Extra Credit: Got Milk?
The cafeteria only opens at noon. Use the clock behind you:
- Press HS + or − until the red arrow points at 12.
- Press H + or − until the hour hand sits on top of the minute hand.
- Press HM + or − until both hands point at 12.
Take the Cafeteria Key and open the padlock above the counter. When the cook asks, answer “Give me the– Oof. Herring and milk please…” to get a Red Herring (4/50) and Milk. The cat pays 5 Escape Bucks for the milk.
The hole next to the cat leads to a room with a Red Herring (5/50) on the barrel by the TV. In the cafeteria, there’s 1 Escape Buck on the tray at the table with the sauce, and a Red Herring (6/50) in the sandwich on the table near the Bookstore.
The Bookstore register has 1 Escape Buck. The cashier only sells books if you solve their locks:
- Ciphers from B to A: shift every letter of FVSFLB back by one to get EUREKA.
- Hiding and Seeking: the colored eyes on the cover each look at a symbol. Top to bottom: square, diamond, triangle, circle.
- A Book of Lockpicks: follow the arrows in the title: up, left, up, down, left, up, down.
Headmaster’s Office and Stairwell
Take the Lobby stairs to the top floor and pick up the phone in the Headmaster’s Office. Leave and unlock the only other room on that floor.
On the way up the stairwell from the bottom floor, one of the two vending machines has a Red Herring (7/50) in its pickup tray. Clues are written along the stairs:
- Both words end with the same letter.
- The phrase has three A’s.
- It STarts STrong.
- The second word has a U. No, a double U.
The answer is STAY AWAY. Enter it on the lock at the top, which also gives Don’t Look Down. The escape room is on this floor.
 | Don’t Look Down Navigate to the tallest point on the map. |
That Rings a Bell
Look through the telescope by the wall map. Four symbols light up on the wall: connect them and remember the shape. The four animals on your left each carry a pattern, and only one matches. Enter CAMEL on the lock by the wall and go upstairs.
Collect the gears first: Small Gear next to the gear wall, Medium Gear near the elevator, Large Gear by the chest. Fit them on the wall so the arrows line up into one chain and read them off: right, down, up, left, right, down. Enter that on the mechanism behind the gear behind you.
Upstairs, the telescope shows five shapes. Turn the planetary model behind it so the biggest shape is on the far left and the smallest on the far right: square, hexagon, circle, triangle, pentagon. Take the Shears.
Go back down to the chest area and climb the upward-facing boxes to Reina Wym’s hand for the Cipher Table. Compare the clock with the table to get LUNAR for the boxes, then take the Moonlight.
Shine the Moonlight on each moon phase symbol to reveal a letter, then order them from new moon to full moon:
- E: on the wall next to the gear wall
- C: behind the first letter
- L: above the chest
- I: near the clock part
- P: on the clock part
- S: above the wall behind the clock part
- E: near the elevator
ECLIPSE opens the padlock by the elevator. Pull the lever, cut the rope with the Shears, take the elevator down and climb the stairs behind the clock part.
The sun on the wall shows the seasons: middle for fall, lowest for winter, highest for summer. Set the boxes to match. The words on the boxes tell you the rest: sunrise is east, sunset is west, noon is at the top and afternoon is just left of noon. Jump up and take the Lens.
Put the Lens on the big clock at the top. The number under it is 9795639. Go to the sundial where you found the Lens, set the clock to each of those hours in turn and note the letter: ACAEDGA. Ring the bells in that order to finish the chapter.
 | That Rings a Bell Complete “That Rings a Bell” |
Next: Chapter 2 walkthrough. Every chapter is listed in the Escape Academy 2 Back 2 School walkthrough.
Based on the original walkthrough by aquatorrent.