All Escape Academy 2 Back 2 School guides
Chapter 5 takes place on the Arts Campus. It has the most side content in the game: four Extra Credits before the play, the Death of an Artist murder mystery (the escape room called Chortkoff’s Gun), another three Extra Credits in the Upper Arts Campus and then The First Chamber.
Chapter 5: Arts Campus, Death of an Artist and The First Chamber
From the Headmaster’s Tower, go right and down the stairs, then follow the tunnel underground to unlock the Arts Campus (Acting Out).
 | Acting Out Unlock the Arts Campus. |
Arts Campus
Set up the zipline (6/10).
Extra Credit: A Real Headspinner
The student hanging his head gives A Real Headspinner. His note says to start at the Star, that Walking the Dog comes after the Salsa but before the Moonwalk, that the Robot follows the Running Man, and that the Salsa follows the Robot. The order is Star, Running Man, Robot, Salsa, Dog, Moonwalk, worth 5 Escape Bucks.
The potted plant behind him has a Red Herring (27/50). Turn around, hop on the nearby trash bin to reach the roof and look northwest: a pipe by the next building has 1 Escape Buck. Use the pipe to jump across, then go right for another buck between the roof and the tent. Climb to the top of the red tent for a third. Back on the ground, the potted plant to the left of the 32-puzzle-piece building has 1 Escape Buck.
Extra Credit: Cliff Notes (3/5 and 4/5)
Two more Cliff Notes spots are on this campus:
- Mural on the dam: the Costume Shop sits next to the snackdoku machine. You can’t go in yet, but you can climb the benches beside it and jump toward the dam.
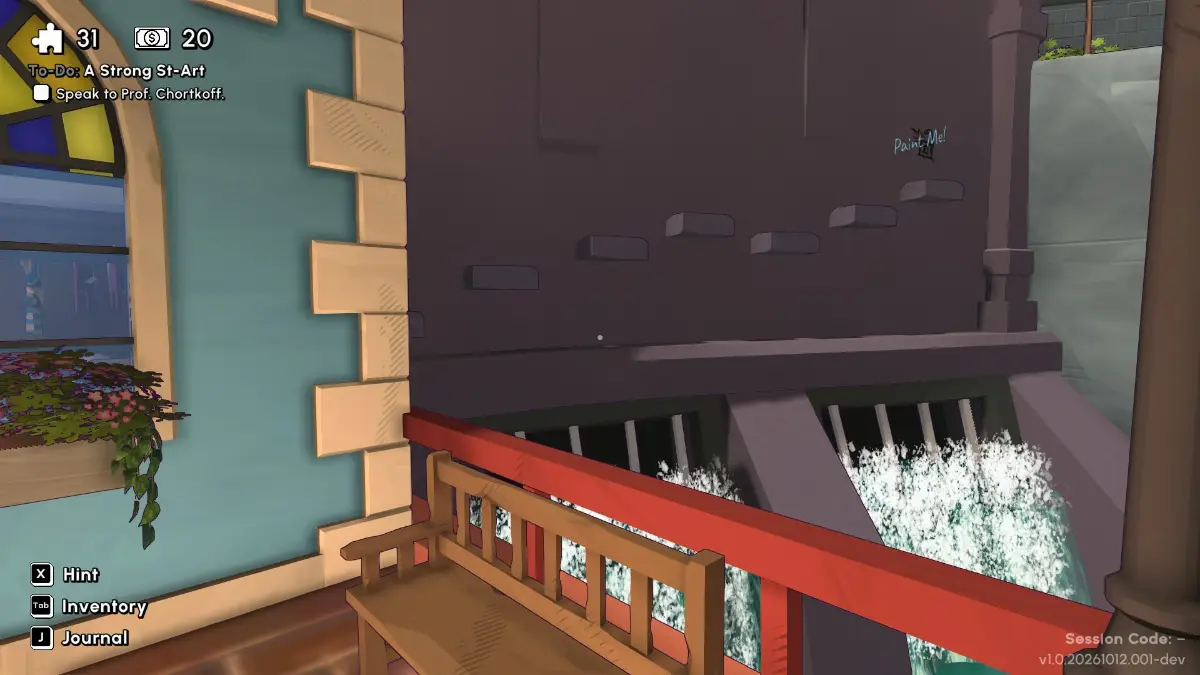
- “Improve” the theater marquee: reach the zipline, or from the bottom climb two sets of stairs and jump from the outdoor AC unit onto the left building’s roof. Drop to the ledge with two couples, climb the crates to the other side of the roof and take the stairs down to the sign.
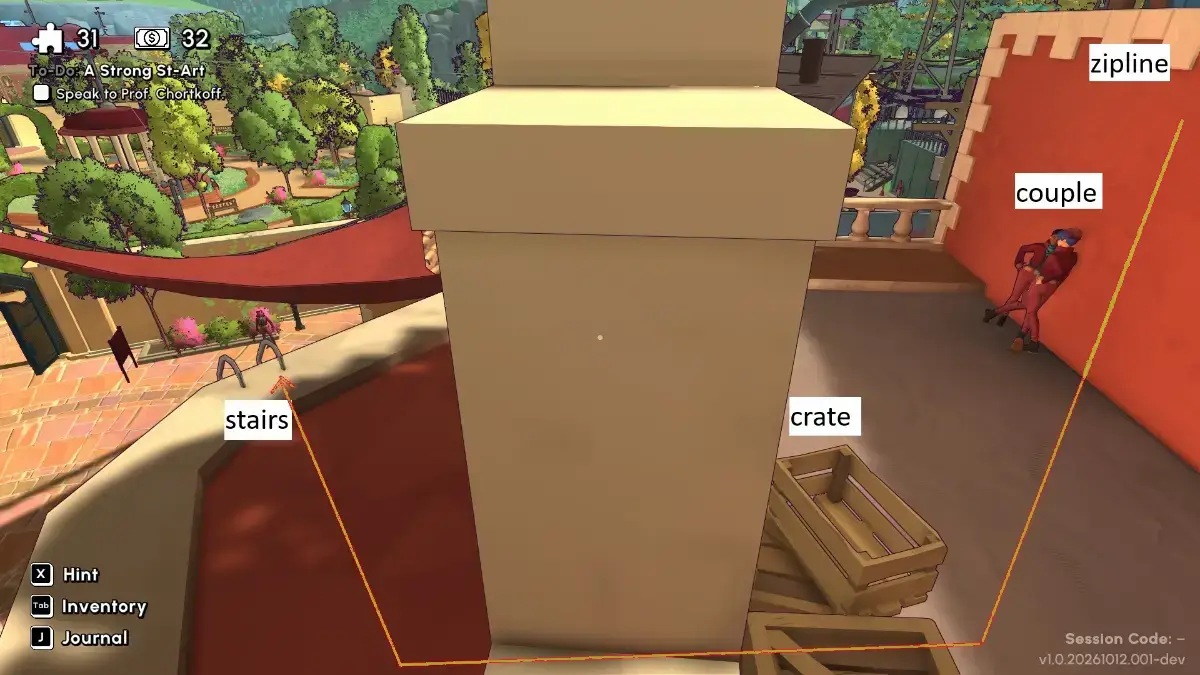
From the middle of the campus, go up two flights of stairs and straight to a wall. On the left, a green trash bin has a Red Herring (28/50) on top. The outdoor units on the nearby building work like steps up to the zipline, and a ledge from there leads to a small roof section with 1 Escape Buck on the crates.
Jump onto the roof across the way near the couple and run into the electricity pole by the fence on your right. You need to hit it from the roof. That’s Snap, Crackle, Pop! (2/3).
Extra Credit: Say Cheese
Drop down and climb three sets of stairs to the woman who gives Say Cheese. Buy Spray Cheese from the snackdoku machine two flights down, next to the Costume Shop:
| C1 | A3 | B4 | D2 |
| B2 | D4 | C3 | A1 |
| D3 | B1 | A2 | C4 |
| A4 | C2 | D1 | B3 |
The code is A2, and the reward is 10 Escape Bucks. Grab 1 Escape Buck from the pot by the bench.
Extra Credit: Clues and Cubes
Go all the way up and follow the path to the man with a big cube. One symbol on the cube is fixed, and you need to arrange the rest around it. Blue cubes around the campus show which symbols sit next to each other:
- By the snackdoku machine: guitar on top, dancers (upside down) on the left, mask (upside down) below.
- Near the Music Studio: palette on top, singers on the left, mask below.
- Behind the Theater Workshop: palette on top, dancers on the left, jar (upside down) below.
Around the mask, that gives:
- Top: palette
- Left: singers
- Right: dancers
- Down: guitar
- Bottom: jar
The cube pays 5 Escape Bucks. Go back to the ground floor and talk to Professor Chortkoff.
Theater Workshop
In the building behind you, take 1 Escape Buck from the stool and a Red Herring (29/50) from the leftmost shelves, second row from the top. Chortkoff gives you Audition Sides. Pin them and listen to each kid’s audition:
- Edie: Pass
- Brenda: Fail
- Link: Pass
- Phoebe: Fail
- Garth: Fail
- Debra: Pass
- Tyler: Pass
- Vincent: Fail
Put the headshots on the board. Then read the résumés and cast the roles:
- Peter: Tyler
- Chet: Link
- Ruby: Debra
- Detective: Edie
Costume Shop
Go upstairs to the Costume Shop. There’s 1 Escape Buck by the school jacket hanging on the right. Crouch at the table in the middle for a Red Herring (30/50) on the storage shelf. Talk to Professor Slip.
The chest on the right has a note and two padlocks. The left one wants the dresses from tallest to shortest, the right one their colors:
- Left: 26013
- Right: 21306
Take the Puzzle Patch Kit and use it on the torn curtain on the same table to make the aMAZEing Cloak. It has a small puzzle of its own.
The chest on the left has a pattern, and the paper behind it shows more patterns. Combine the matching patterns in the order the chest’s note gives to spell YARN. Take the Fabric Shears, cut the moustache paper on the table into an Escapist Moustache and give both items to Slip.
Dance Studio
Go up again to the Dance Studio. Quanty (6/11) is here. The windows across the room have a Red Herring (31/50), and there’s 1 Escape Buck behind the water jug.
Coach Yoach’s poster is really a list of cassette buttons: stop, pause, play, fast-forward, stop, rewind. From left to right on the player those are buttons 5, 2, 3, 4, 5, 1. Take the Dance Step Diagrams.
The second poster lists four dances: Cipherston, Lockbox Step, Clue-pid Shuffle and Escape Vine. Pin the diagrams, start from the footprints in the bottom right of the floor grid and follow each dance to see which mirror number it ends on:
- Cipherston: 8 → 3
- Lockbox Step: 3 → 2
- Clue-pid Shuffle: 2 → 5
- Escape Vine: 5 → 8
The safe under the cassette table takes 3258. Take The Greatest Dance Ever and pin it. Keys 1–4 are wave, thumbs up, raise fist and clap. Talk to Quanty and perform 1, jump, 4, jump, 4.
Buy a ticket from Gillian at the ground-floor booth and talk to the ushers.
Death of an Artist
Read the B.S. Detective Agency sign above the counter and answer the phone:
- “Hello there, this is the office of Detective…”
- “Bertrand…”
- “…Solverson.”
- “That’s why they call me Solverson. I’ll see you shortly.”
When Chet arrives, pick any option except the last, then “Good thing I have a fridge full of Escape’s number one beverage!”
The note on the counter says drinks are for detectives, so dress for it from head to toe. Each piece of the outfit has a number:
- Hat, on the sofa: 4
- Sunglasses, in your desk drawer: 0
- Coat, on the hanger: 6
- Shoes, behind your desk: 9
The lock under the counter takes 4069. Take the Escapist’s Edge from the rack, hand it to Chet and say “Tell me everything that you saw. Spare no detail or feeling!”
Chet says he was walking by the pond in a quiet part of town, heard a bang he first blamed on the burnt-out lock factory to the north, ran across the street into Peter Hintz’s living room and found Ruby L’Innocent standing over the body with a smoking gun. Answer:
- “Not so fast Badman, I need to give the crime scene a good look first.”
- “Nonsense! Your alibi is enough to figure out exactly where Peter lives!”
Right-click out of the conversation and use the map to place Peter’s house from Chet’s story: 30 Arson Avenue. Then say “Because I’m a detective. Detective Solverson.”
At the crime scene, answer Chet with:
- “Something’s not adding up Chet, and I don’t mean mathematically…”
- “There are no bullet holes!”
- “Obviously! And I’ll tell you exactly what it was…”
Leave the conversation and compare the blood on the suitcases, kitchen cabinet and toolbox with the body. Then tell Chet “The real murder weapon is in his kitchen cabinet…” and “Peter was killed by a knife!”
When Chet asks who would want Peter dead, leave the conversation. The cabinet lock says “All eyes on me”: enter the pictures that are looking at it, atomic circle, medal, magic wand. Take the Incriminating Painting, give it to Chet and say “Fair, if oddly pointed, analysis. But we need to hear what Ruby has to say!”
The mailbox has a four-letter lock that says “Start small”. The window shows a list of objects, and props around the stage carry letters:
| Object | Where | Letter |
|---|---|---|
| Apple | Tree on the right | S |
| Squirrel | Near the roof | E |
| Bird | Tree on the left | B |
| Unicorn | Right side | P |
| Flamingo | Middle | C |
| Gazebo | Right side | M |
| Car | Left side | R |
| Tree | Left side | L |
| Elephant | Right side | E |
| Dinosaur | Left side | T |
Take only the objects from the window list and sort them from smallest to largest: apple, squirrel, flamingo, car, elephant, dinosaur. That spells SECRET. Take the Door Key and open the door.
Dip the Incriminating Painting in the fountain to get the Really Incriminating Painting. Talk to Ruby:
- “You’re the murderer?”
- “Frowned upon? Yes. But the truth? I don’t think so!”
- “Gladly! Peter wasn’t shot…”
- “He was stabbed!”
- “The painting doesn’t incriminate Peter Hintz.”
Hand her the Really Incriminating Painting, then answer “What’s more is that you’re the murderer, not Ruby!”, anything, and “Bertrand Solverson!” That completes Chortkoff’s Gun.
 | Chortkoff’s Gun Complete “Chortkoff’s Gun” |
Upper Arts Campus
Climb every flight of stairs to the top and open the 40-puzzle-piece door. Go left to the bench by the 80-puzzle-piece door for 1 Escape Buck, and check the fountain for a Red Herring (32/50).
Back on the main path, head north and pay for the zipline (7/10). Ride it up right away, go north to The Greatest Escapists of All Time monument and look down at the terrace for 1 Escape Buck.
Extra Credit: Accordion to Plan
Go back to the 40-piece door, turn to face the campus and climb the stairs on the left to the accordion player. His poster describes his most annoying melody: the last note of the frightening one, the middle two notes of the beautiful one and the first note of the depressing one. The sheets on the table:
- Beautiful: DFCD
- Frightening: BGAA
- Depressing: BGEF
That makes AFCB. The accordion is unusual: for each note, press the keys that form its symbol, then hit Play on the right. Numbering the white keys 1–8 and the black keys 1–4 from the top:
| Note | White keys | Black keys |
|---|---|---|
| A | 3, 6, 7 | – |
| F | 1, 4 | 3 |
| C | 3, 8 | 3 |
| B | 2 | 1, 4 |
He pays 5 Escape Bucks. Walk past him for 1 Escape Buck on the terrace, then carefully follow the fence to The Greatest Escapists of All Time pillar and drop down for another buck behind the statue.
The Monkey Door
From the middle of the area, go right to the monkey-faced 40-piece door. Quanty (7/11) is here. Inside, take 1 Escape Buck from the painting by the north door.
The colored panels on the left door follow the layout of the names on The Greatest Escapists of All Time pillar. Find the name in each position and pick the color it suggests. Left to right: olive (dark yellow), red, brown, purple, white.
Grab 1 Escape Buck from the crate, then head to the east side past Quanty. There’s a Red Herring (33/50) behind the aquarium.
Extra Credit: Once More With Eeling
The man by the door wants you to spot the differences between the paintings:
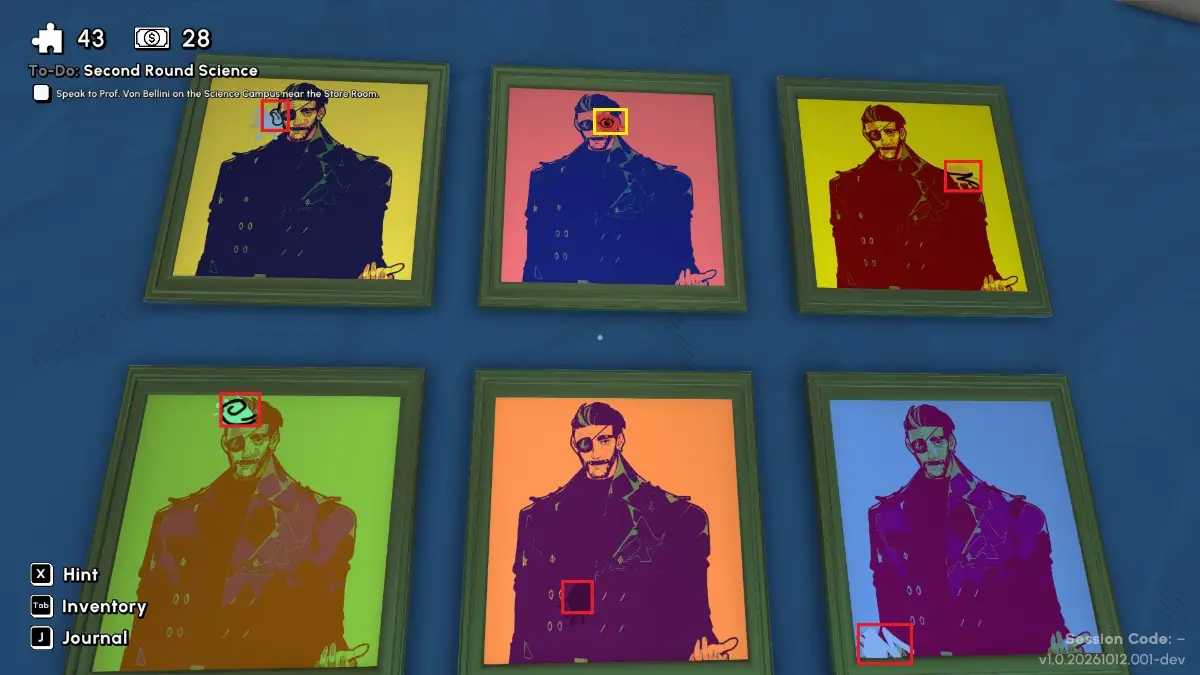
That’s 5 more Escape Bucks. Talk to your friends in the middle of the area to continue.
Finding the Chamber
Put on the glasses. The statue in the middle that reads “Only those with the eyes can see” glows purple. Click it, take the Strange Cipher and pin it. Follow the footprints from the statue, translating each symbol you pass. They lead through the monkey door to another statue that needs a six-letter code:

Left to right it reads UNMASK. Drop down into the chamber.
The First Chamber
On the right side of the shelves behind the big statue are a Wine Bottle and a Jar of Ink. Turn around for the Oil Bottle on the other side. A Jar of Honey sits on the shelf by the door on the left side of the room. Pour all four into the jar to the left of the statue and note how the liquids layer by density and color. The chest marked “Don’t be dense!” takes:
- Light blue (looks light yellow under this light)
- Blue (looks dark blue)
- Purple (looks red)
- Light blue
Take the Stone Tablet. On the right side of the room, a skeleton next to a chest holds the Skeleton’s Key. It opens the small chest on the left, which has a Duster Brush and a Photograph.
Dust all five plaques: two on the left, two on the right and one by the grate at the back. Each is numbered, and each shows a group of objects. The chest on the right says “We don’t fit in”: in each plaque, find the object that doesn’t belong and press its position. Numbering the chest’s buttons like this:
| 1 | 2 | 3 |
| 4 | 5 | 6 |
Going from plaque 1 to 5, the code is 2, 5, 4, 3, 5. Take A Warning, A Scolding and An Ask.
Now fill in the big statue:
“In the year 1783 (the Photograph), Sameer Gaspard unearthed an ancient Escapist Tablet (its shape matches the cutout in the Photograph) in Greece (the Photograph’s background). It showed a method for using Brains and Lightning to unlock Immortality (all three from the Stone Tablet). Reina Wym (A Scolding) thought it was nonsense. Fernando Augustin (A Warning) was frightened. Alistair Bell (An Ask) became obsessed. Nothing was ever the same between us.”
Pull the lever for A Monumental Discovery. Leave, talk to Reed in the Upper Arts Campus and check the scarf by the door back to the Arts Campus to start the next chapter.
 | A Monumental Discovery Complete “The First Chamber” |
Previous: Chapter 4 walkthrough. Next: Chapter 6 walkthrough. Every chapter is listed in the Escape Academy 2 Back 2 School walkthrough.
Based on the original walkthrough by aquatorrent.