All The Darkside Detective guides
The Darkside Detective sends McQueen and Dooley through six main cases, the Christmas episode Buy Hard, and the bonus cases Polterguys and Baits Motel. Each case is a chain of short trips between rooms, item pickups, and item combinations.
Several cases also stop you with a small puzzle: a darkside doorway with missing symbols, a rooftop junction box, a virus grid, a water valve, a signal map, a tinfoil hat, a life ring portal, and a weight bench.
Step-by-Step Solutions for 9 Cases
Achievements are not covered in these steps. For achievement tips, see the The Darkside Detective 100% achievement guide.
Case 1: Malice In Wonderland
Outside, in the rain
- Head into the house.
Living room
- Ask Mr Jones, “Where were you last night?”
- You receive the MATCHES.
- Move to the hallway.
Hallway
- Try the study door. It is locked.
- Go into the closet.
Closet
- Search the box of junk to find the BLACKLIGHT BULB.
- Return to the hallway.
Hallway
- Head back to the living room.
Living room
- Go up the stairs.
Upstairs
- Go into the daughter’s bedroom.
Daughter’s bedroom
- Check the pens to get the BLACKLIGHT MARKER.
- Leave the room.
Upstairs
- Go into the master bedroom.
Master bedroom
- Search the bed to find the STRANGE PAGE.
- Talk to the nanny and pick “Say, you’re the nanny…”
- She hands over the STUDY KEY.
- Leave the room.
Upstairs
- Head downstairs.
Living room
- Move to the hallway.
Hallway
- Unlock the study door with the STUDY KEY.
Study
- Grab the LANTERN from the bookshelf.
- Leave the room.
Hallway
- Go back into the living room.
Living room
- Go up the stairs.
Upstairs
- Pull the black cord to get into the attic.
Attic
- Pick up the PAINT THINNER.
- Fit the BLACKLIGHT BULB into the broken lamp.
- Use the STRANGE PAGE on the darkside doorway.
- Drag each missing symbol into its correct slot.
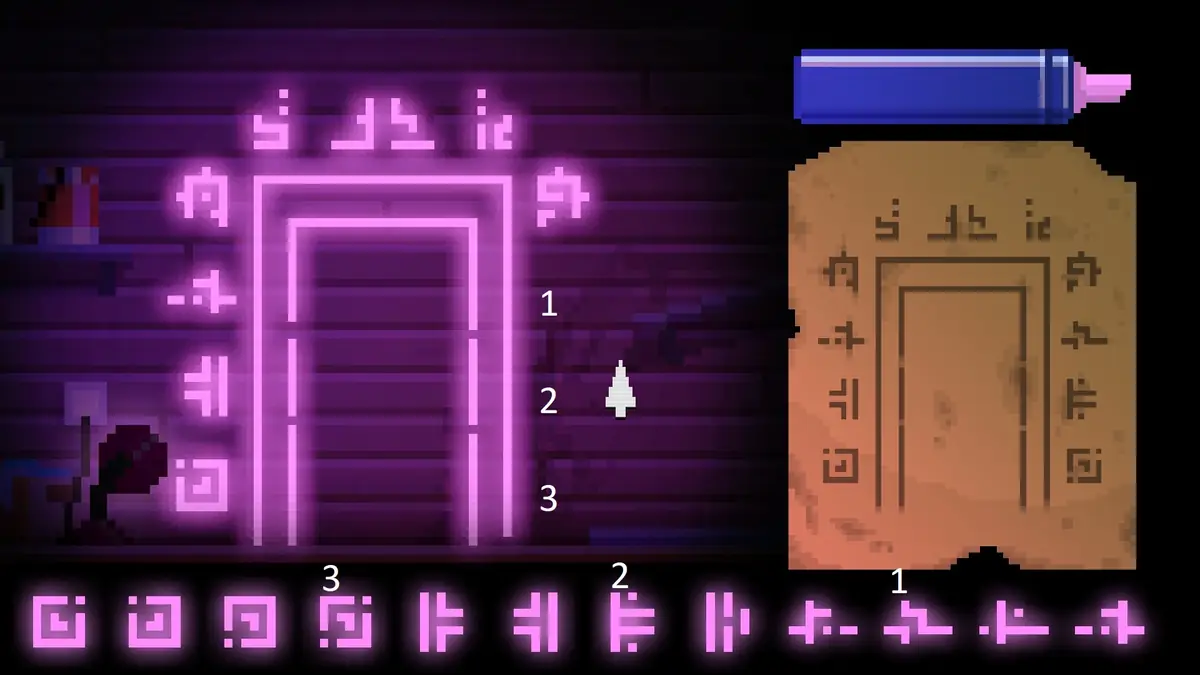
- Light the LANTERN with the MATCHES.
- Use the LIT LANTERN on the darkside doorway.
Darkside attic
- Talk to Alice.
- When you talk to the nanny, choose “Once Dooley wakes up, you and your scheme will be done for.”
Attic
- Use the PAINT THINNER on the demonic doorway.
Case closed.
Case 2: Tome Alone
Outside, in the rain (again)
- Head inside.
Lobby
- Go into the office.
Office
- Search the office supplies to get the SCISSORS.
- Check the coat rack to get the BUTTON.
- Leave the room.
Lobby
- Ride the elevator.
Elevator
- Press 2.
Sci-Fi and Fantasy/Children hallway
- Go left to Sci-Fi and Fantasy.
Sci-Fi and Fantasy
- Look at the rocket to get the METAL STRIP.
- Pick up the LIBRARY CARD in the bottom left.
- Return to the hallway.
Sci-Fi and Fantasy/Children hallway
- Go to the children’s section.
Children’s section
- Take the red VIEWMASTER from the bookshelf on the right.
- Return to the Sci-Fi and Fantasy/Children hallway.
Sci-Fi and Fantasy/Children hallway
- Ride the elevator.
Elevator
- Press 3.
Third floor hallway
- Go left to the reading room.
Reading room
- Go into the microfilm room.
Microfilm room
- Cut the box of microfilm with the SCISSORS.
- Use the VIEWMASTER on the cut-up microfilm.
- Click the arrow a few times.
- Leave the room.
Reading room
- Talk to Yeats.
- Go into the microfilm room.
Microfilm room
- Talk to Crowley.
- Leave the room.
Reading room
- Talk to Raxa to get the ADMIN PASSWORD.
- Go into the microfilm room.
Microfilm room
- Use the ADMIN PASSWORD on the computer.
- Talk to Crowley.
- Leave the room.
Reading room
- Talk to Yeats.
- Go to the third floor hallway.
Third floor hallway
- Go to Hobby/DIY.
Hobby/DIY
- Pick up the GLUE.
- Talk to Gail.
- Combine the BUTTON with the METAL STRIP to make the CONDUCTIVE BUTTON.
- Give the CONDUCTIVE BUTTON to Gail.
- Return to the third floor hallway and get in the elevator.
Elevator
- Press the BUTTON (4).
Fourth floor hallway
- Go right.
Horror section
- Look at the K – L shelf.
- Talk to Edgar Allan Poe.
- Return to the fourth floor hallway.
Fourth floor hallway
- Ride the elevator.
Elevator
- Press 2.
Sci-Fi and Fantasy/Children hallway
- Go right.
- Talk to Enid Blyton.
- Return to the Sci-Fi and Fantasy/Children hallway.
- Ride the elevator.
Elevator
- Press 1.
Lobby
- Optional: talk to the librarian (“I’d like to borrow that book you’re reading.”) and show her the LIBRARY CARD you found.
- Go into the office.
Office
- Use the photocopier to get a PHOTOCOPY.
- Use the GLUE on the LIBRARY CARD to make the STICKY LIBRARY CARD.
- Use the PHOTOCOPY on the STICKY LIBRARY CARD to make the FAKE LIBRARY CARD.
- Leave the office.
Lobby
- Show the FAKE LIBRARY CARD to the librarian to get the TRASHY NOVEL.
- Ride the elevator.
- Press the BUTTON (4).
Fourth floor hallway
- Go right.
Horror section
- Give the TRASHY NOVEL to Poe.
- Return to the fourth floor hallway.
Fourth floor hallway
- Ride the elevator.
Elevator
- Press 2.
Sci-Fi and Fantasy/Children hallway
- Go right.
Children’s section
- Talk to Enid Blyton to get the LOVECRAFT NOVEL.
- Return to the Sci-Fi and Fantasy/Children hallway.
- Ride the elevator.
Elevator
- Press the BUTTON (4).
Fourth floor hallway
- Go right.
Horror section
- Put the LOVECRAFT NOVEL back on the K – L shelf.
- Pull the lever.
- Step through the spooky doorway.
Secret room
- Try to take the RITUAL BOOK.
- Take the SKULL from the shelf.
- Use the SKULL on the crawl space.
- Leave the secret room.
Horror section
- Go left.
Fourth floor hallway
- Ride the elevator.
Elevator
- Press 2.
Sci-Fi and Fantasy/Children hallway
- Go right.
- Get the ROOF KEY.
- Go left.
- Ride the elevator.
Elevator
- Press the BUTTON (4).
Fourth floor hallway
- Open the window with the ROOF KEY.
Roof access
- Climb the ladder.
Roof
- Examine the junction box.
Junction box
- Link the left red cable to the lower right red cable.
- In short, move all the horizontal pieces to the bottom.
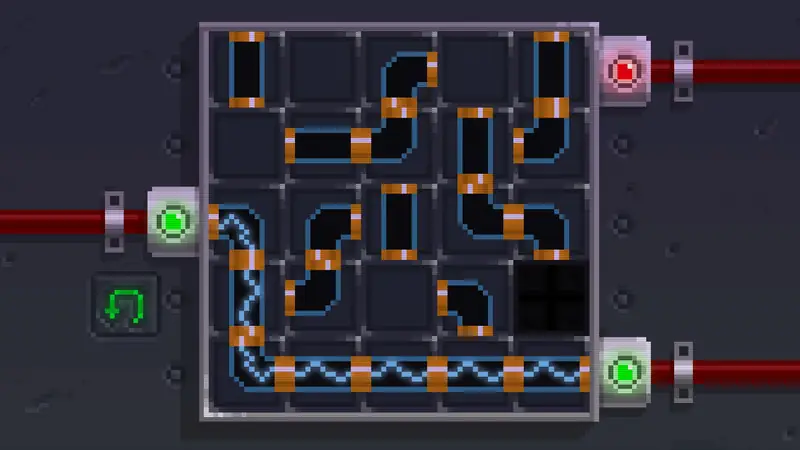
Alternative solution:
Roof
- Climb back down.
Roof access
- Go back inside.
Fourth floor hallway
- Go right.
Horror section
- Step through the spooky doorway.
Secret room
- Close the book.
Case closed.
Case 3: Disorient Express
Some street
- Head downstairs.
Stairs
- Crawl under the barrier on the right.
Platform, left
- Talk to the conductor and ask “…ticket?”
- Go right.
Platform, right
- Search the janitor cart to get a HANDLE.
- Search the bin to get the RECEIPT.
- Go into the toilets.
Toilets
- Enter the right cubicle and talk to the spooky hoverer (Shaq).
- Enter the left cubicle and take the TOILET PAPER.
- Enter the right cubicle again and give the TOILET PAPER to Shaq.
- You receive the OCCULT COIN.
- Leave the toilets.
Platform, right
- Go left.
Platform, left
- Head upstairs.
Stairs
- Use the OCCULT COIN on the ticket machine to get a TICKET.
- Head downstairs.
Platform, left
- Give the TICKET to the conductor.
- Board the eerie train.
Darkside train
- Go right to the tracks.
Tracks
- Go right through the portal.
Darkside tracks
- Go right to the train.
Train
- Go to the platform.
Darkside platform, right
- Head upstairs.
Darkside stairs
- Take the FUZZY MOULD.
- Go outside.
Darkside outside
- Go into the costume shop.
Darkside costume shop
- Give the RECEIPT to the shopkeeper to get the SWIMMING CAP.
- Go back outside.
Darkside outside
- Head downstairs.
Darkside stairs
- Go to the platform.
Darkside platform, right
- Combine the FUZZY MOULD with the SWIMMING CAP to make the BAD DISGUISE.
- Use the BAD DISGUISE on McQueen.
- Talk to the ghost cop.
- Go left.
Darkside platform, left
- Go into the toilets.
Darkside toilets
- Enter the right cubicle and examine the toilet.
- You get the PLUNGER HEAD.
- Combine the HANDLE with the PLUNGER HEAD to make the PLUNGER.
- Leave the toilets.
Travel all the way back to the lightside toilets. If you already picked up the key, put it back before you try this, or McScream won’t let you through.
Lightside toilets
- Enter the middle cubicle and use the PLUNGER on the tentacle.
Travel all the way back to the left side of the darkside platform.
Darkside platform, left
- Go into the control room.
Darkside control room
- Take the KEY.
- Leave the room.
Darkside platform, left
- Go into the toilets.
Darkside toilets
- Enter the middle cubicle and give the KEY to the tentacle.
- Use the PLUNGER on the tentacle.
- Leave the toilets.
Travel all the way back to the lightside toilets.
Toilets
- Enter the middle cubicle.
- Take the KEY from the tentacle.
- Leave the toilets.
Platform, right
- Open the control room with the KEY.
Control room
- Look at the computer.
- Eject the disk to get the CURSED DISK.
- Click “escape”.
- Leave the room.
Travel all the way to the lightside train on the darkside tracks.
Train
- Give the CURSED DISK to Raxa.
- Click bottom-right, then top-center, then bottom-left to finish in three moves.
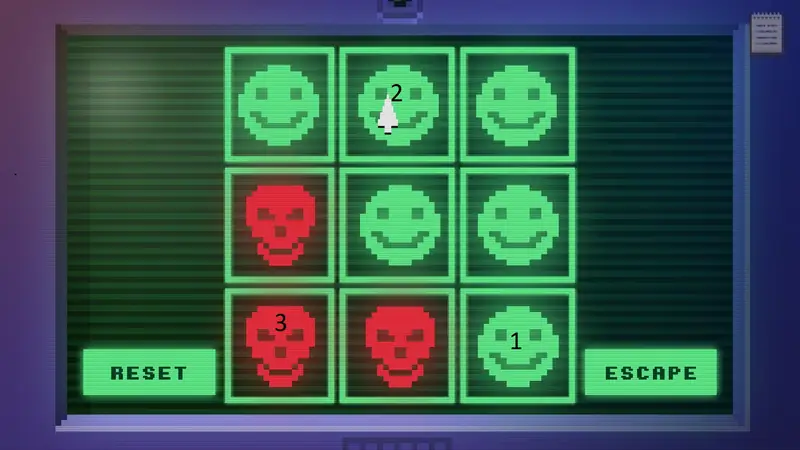
- You receive the ANTIVIRUS DISK.
Travel all the way back to the lightside control room.
Control room
- Use the ANTIVIRUS DISK on the computer.
Case closed.
Case 4: Police Farce
McQueen’s office
- Leave the office.
Offices hallway
- Go right.
Bullpen
- Go into the debriefing room.
Debriefing room
- Take the CAN OF WHIPPED CREAM.
- Leave the room.
Bullpen
- Take the BUST FIRE EXTINGUISHER and the HEADPHONE WIRES.
- Go into the debriefing room.
Debriefing room
- Combine the BUST FIRE EXTINGUISHER with the CAN OF WHIPPED CREAM to make the FIXED FIRE EXTINGUISHER.
- Use the FIXED FIRE EXTINGUISHER on the pile of gifts.
- Examine the pile of gifts.
- Leave the room.
Bullpen
- Go left.
Office hallway
- Examine the bust ceiling fan to get the FAN MOTOR.
- Get a COFFEE from the coffee machine.
- Go into McKing’s office.
McKing’s office
- Take the HELMET TROPHY.
- Leave the room.
Office hallway
- Go right.
Bullpen
- Go right.
Stairwell
- Go to the garage (bottom left).
Garage
- Go left.
Construction site
- Get the MONKEY WRENCH from the toolbox.
- Use the water valve.
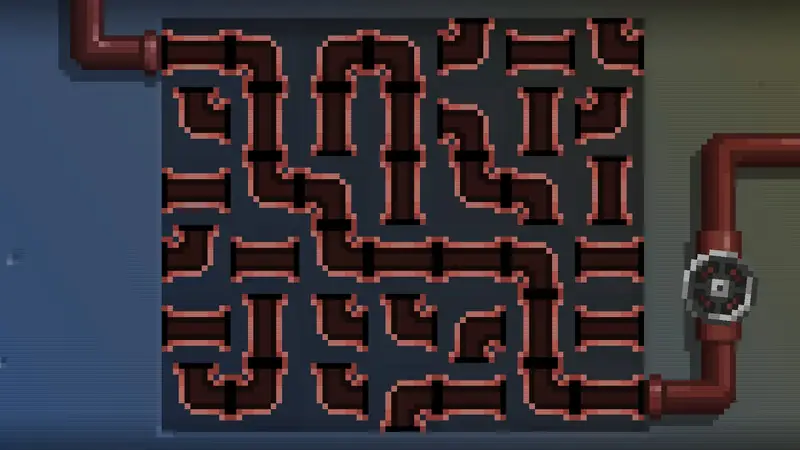
- Go right.
Garage
- Use the MONKEY WRENCH on the air vent.
- Take the HOOD.
- Go right.
Stairwell
- Go to the shooting range (bottom right).
Shooting range
- Place the HOOD in front of the bullet hole.
- Go left.
Stairwell
- Go top right.
Reception
- Take the LAXATIVES from the first aid kit.
- Go right.
Holding Cells
- Take the HOSE.
- Look inside holding cell three and talk to Tam.
- You get the KNIFE.
- Look inside holding cell two and talk to Mr Jones.
- You get the MATCHES.
- Go left.
Reception
- Go into dispatch.
Dispatch
- Search the drawers between the dispatcher and the gremlin to get the BOBBYPIN.
- Talk to the gremlin.
- Leave the room.
Reception
- Go left.
Stairwell
- Go to the shooting range.
Shooting range
- Use the MATCHES on the sprinklers.
- Pick up the SHOOTING RANGE GREMLIN and go left.
Stairwell
- Combine the COFFEE with the LAXATIVES to make the SPIKED COFFEE.
- Give the SPIKED COFFEE to McKing.
- Use the BOBBYPIN on the FAN MOTOR to get the MAGNET.
- Use the MAGNET on the evidence room.
Evidence room
- Take the MAGICAL TOME.
- Take the GAS GRENADE.
- Combine the HOSE with the HELMET TROPHY to make the DIVING HELMET.
- Use the DIVING HELMET on McQueen.
- Throw the GAS GRENADE at the gremlin.
- Pick up the EVIDENCE GREMLIN.
- Leave the room.
Stairwell
- Go to the garage.
Garage
- Use the KNIFE on the junction box.
- Use the HEADPHONE WIRES on the junction box.
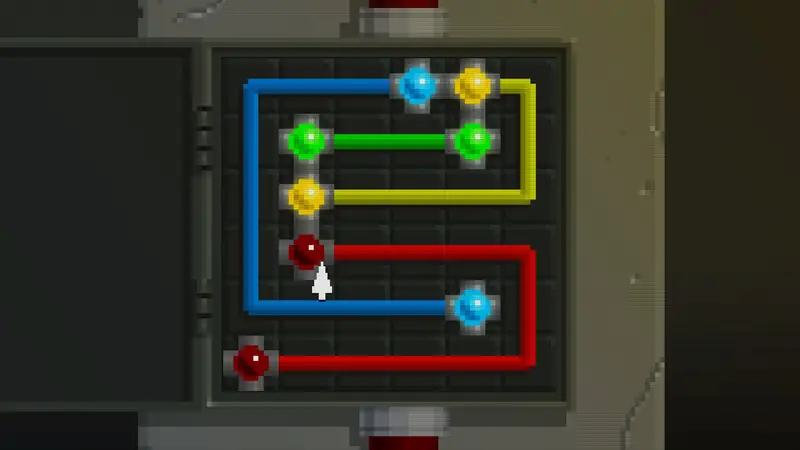
- Go right.
Stairwell
- Go right.
Reception
- Go into dispatch.
Dispatch
- Pick up the DISPATCH GREMLIN.
McQueen’s office
- Put the gremlins into the urn Dooley is holding to get GREMLINS.
- Leave the room.
Travel all the way to the construction site.
Construction site
- Pick up the pot of clay to get the CLAY.
Travel all the way back to the office hallway.
Office hallway
- Use the CLAY on the water cooler to get the WET CLAY.
- Go into McKing’s office.
McKing’s office
- Use the WET CLAY on the pottery wheel to make the URN.
- Combine the MAGICAL TOME with the URN to make the MAGIC URN.
- Put the GREMLINS into the MAGIC URN.
Case closed.
Case 5: Loch Mess
Outside of Camp Site
- Go left.
Yard
- Read the sign to get the WOODEN PLANK.
- Go right.
Campfire
- Go right.
Rec building exterior
- Go into the building.
Rec building hallway
- Go into the dorms.
Dorms
- Examine the pillow on the lower bunk bed on the right to get the MARSHMALLOWS.
- Open the props chest to get the PROPS.
- Leave the room.
Rec building hallway
- Go into the office.
Office
- Use the PC and check the recycling bin for the password.
- Use the oscilloscope and enter the password.
- Ask “What was the signal Dooley found?”
- Then say “I need that info, if you won’t tell me, I’ll have to *commandeer* it.”
- Move the marker across the map to find the spots the signal passed through. Click and hold the arrow buttons on screen.
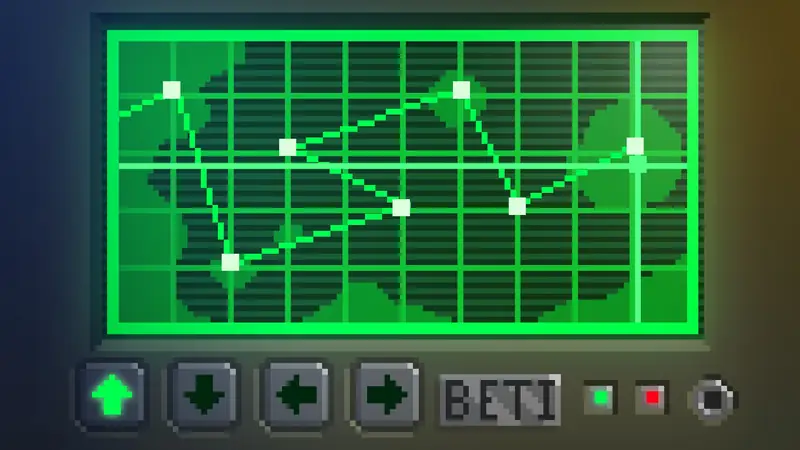
- You get a MAP.
- Leave the room.
Rec building hallway
- Go left.
Canteen
- Take a POT.
- Take the TUBING hanging from the aquarium.
- Go right.
Rec building hallway
- Leave the building.
Rec building exterior
- Go right.
Lakeside
- Take the EMPTY GAS CAN.
- Try to use the boat.
Travel all the way left to the yard where your car is parked.
Yard
- Combine the EMPTY GAS CAN with the TUBING to make the SYPHONING KIT.
- Use the SYPHONING KIT on the cop car to get the FULL GAS CAN.
- Go right.
Campfire
- Put the MARSHMALLOWS in the POT to get the POT OF MARSHMALLOWS.
- Use the POT OF MARSHMALLOWS on the fire to get the MELTY MARSHMALLOW GLOOP.
Go to the lakeside.
Lakeside
- Use the FULL GAS CAN on the boat.
- Combine the MELTY MARSHMALLOW GLOOP with the WOODEN PLANK to make the STICKY PLANK.
- Use the STICKY PLANK on the boat.
Jetty
- Go right.
Forest
- Go right.
Cave mouth
- Go through the badly hidden cave entrance.
Lair
- Search the arts & crafts table to get the INK.
- Take the STICKY TAPE.
- Go back outside.
Go to the jetty.
Jetty
- Combine the INK with the MAP to make the FAKED SIGHTING.
- Give the FAKED SIGHTING to the reporter.
- Take the CAMERA.
- Go right.
Forest
- Give the PROPS to the kids.
- Use the CAMERA on “Big Foot” to get the PHOTOGRAPHIC EVIDENCE.
Travel all the way left to the lakeside.
Lakeside
- Show the PHOTOGRAPHIC EVIDENCE to Barry and Larry.
- Search the cooler to get the TINFOIL.
Travel all the way right to the lair.
Lair
- Combine the TINFOIL with the STICKY TAPE. You can do this anywhere, and the game moves you to the lair automatically.
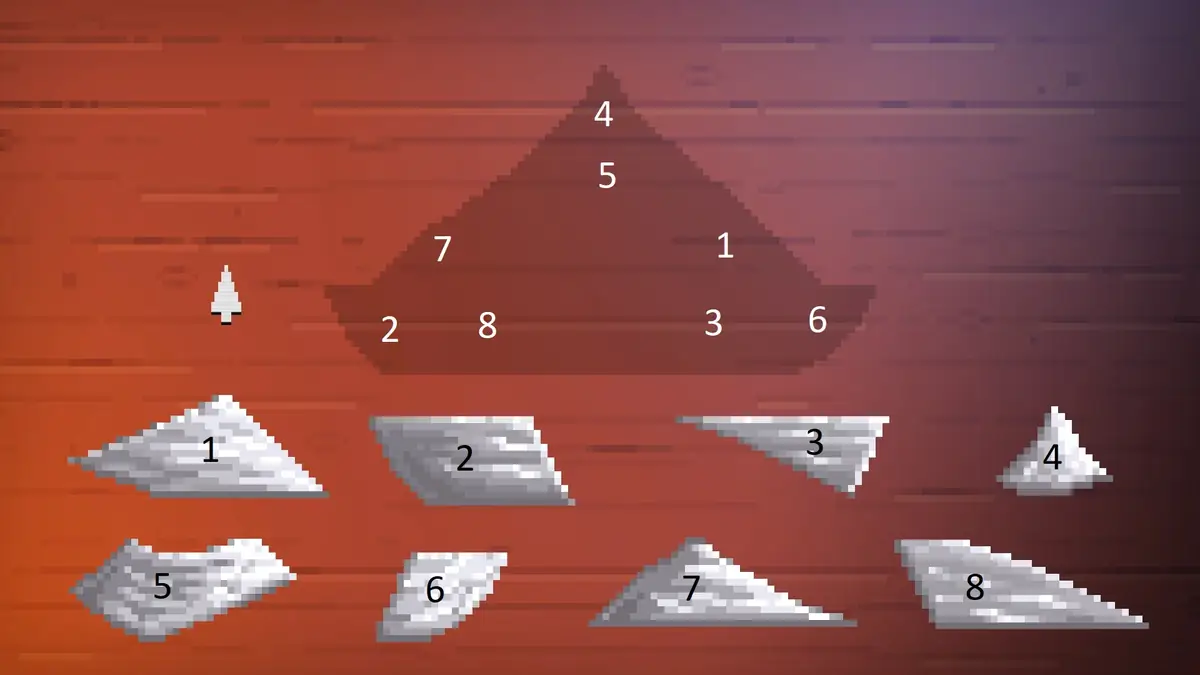
- You get the TINFOIL HAT.
- Give the TINFOIL HAT to Nigel.
Case closed.
Case 6: Don Of The Dead
Debriefing room
- Leave the room.
You can visit and finish the three locations on the map in any order.
Chinatown
Outside Wang’s
- Look at the trash to get the BROKEN RACKET.
- Go inside.
- Take the HEALING CRYSTALS.
- Take the DREAMCATCHER.
- Use the HEALING CRYSTALS on the DREAMCATCHER to get the STRING.
- Combine the STRING with the BROKEN RACKET to make the NET.
- Open the large trunk.
- Use the NET on the undead trinkets to get the MONKEY PAWS.
- Put the MONKEY PAWS inside the large trunk.
- Pick these dialogue lines: “What happened here?”, “Tell me more about the robbery.”, “Floated in?”
Mansion
Beach
- Walk up to the mansion.
At the front door
- Examine the strange equipment to get the BATTERY.
- Go into the mansion.
Foyer
- Go right.
Kitchen
- Take the CANDLE from the open cupboard on the right.
- Look at the cup to get the STEEL WOOL.
- Go back to the foyer.
Foyer
- Place the candle on the side table.
- Combine the BATTERY with the STEEL WOOL to make the FIRESTARTER.
- Use the FIRESTARTER on the CANDLE.
At the front door
- Talk to Raxa.
- Ask “Is this your equipment?”
- Ask “So, what do the readings say?”
Museum
Outside the museum
- Go inside.
Prehistoric
- Go right.
Anthropology
- Go right.
Ancient Egypt
- Take the SCEPTRE.
- Go back to Prehistoric.
Prehistoric
- Use the SCEPTRE on the dinosaur.
- Pick up the BIRD BONES.
- Go right.
Anthropology
- Use the BIRD BONES on the curiosity cabinet. The lock order is random.
- Take the BRAIN JAR.
- Go right.
Ancient Egypt
- Place the BRAIN JAR inside the sarcophagus.
- Look at the smashed cabinet.
Graveyard
The graveyard opens up as a new location.
On hill
- Look through the telescope.
- Go down.
Front gate
- Search the squad car to get the NIGHTSTICK.
- Use the NIGHTSTICK on the zombies to get the ZOMBIE ARM.
- Go right.
Right side
- Look in the dumpster.
- Use the ZOMBIE ARM on the OIL CAN.
- Back out.
- Use the OIL CAN on the dumpster.
- Climb up to the broken railing.
Sewers
- Go right until you meet the workers, then talk to them.
- Pick up the KANGO HAMMER.
- Go further right and use the KANGO HAMMER on the sewer gate.
Graveyard
- Go to the shed.
Shed
- Talk to the gravedigger.
- Ask “Who are you?”
- Ask “You’re a military man – can you help gear me up for the fight?”
- Take the GASMASK.
- Look at the BOOTS and take them.
- Leave.
Graveyard
- Go right. They need to shoot at you, so don’t skip this.
- Go left.
Water tower
- Take the SCAFFOLDING.
- Combine the BOOTS with the SCAFFOLDING to make the STILTS.
- Put on the STILTS.
- Go left.
Front of church
- Climb in through the broken window.
Pews
- Go left or right.
Altar
- Talk to Chief Ghouley.
- Ask “Are you okay?”
- Climb up to the bell tower.
Bell tower
- Examine the sports bag to get the SCUBA TANK.
- Talk to the priest.
- Ask “What was that about?”
- Ask “Can I have some holy water?”
- You get the HOLY WATER.
- Say “I came to save you. Are you okay?”
- Climb back down.
Altar
- Give the HOLY WATER to Chief Ghouley.
- Optional: talk to Chief Ghouley again and ask “Feel better now?”
- Go left or right.
Pews
- Look out the cracked window.
- Talk to McScream.
- Look out the cracked window again.
- Go left or right.
Altar
- Go into the vestry.
Vestry
- Take the LETTER OPENER.
- Use the shredder on your coat.
- Leave the room.
Altar
- Use the LETTER OPENER on the censer.
- Climb the stairs.
Bell tower
- Talk to the priest.
- Ask “Can you use your facepaints to make me look undead?”
- Climb back down.
Altar
- Go left or right.
Pews
- Leave the church through the main gate.
Front of church
- Talk to the zombies.
- Pick any of the “brains” lines you like.
- Go right.
Water tower
- Go right.
Graveyard
- Go right.
Crypt exterior
- Pick up the CAR KEYS.
- Go into the crypts.
Crypts
- Pick up the LADDER.
- Use the LADDER on the hole in the floor.
- Combine the GASMASK with the SCUBA TANK to make the SCUBA KIT.
- Give the SCUBA KIT to Dooley.
- Leave the crypts.
Travel all the way left and climb the bell tower.
Bell tower
- Talk to the priest.
- Say “I need you to bless the water tower for me.”
- You get the LIFE RING.
Travel all the way back to the crypt exterior.
Crypt exterior
- Use the CAR KEYS on the mafia car.
- Go into the crypts.
- Pick up the paint to get the MAGIKKAL PAINT.
- Combine the LIFE RING with the MAGIKKAL PAINT.
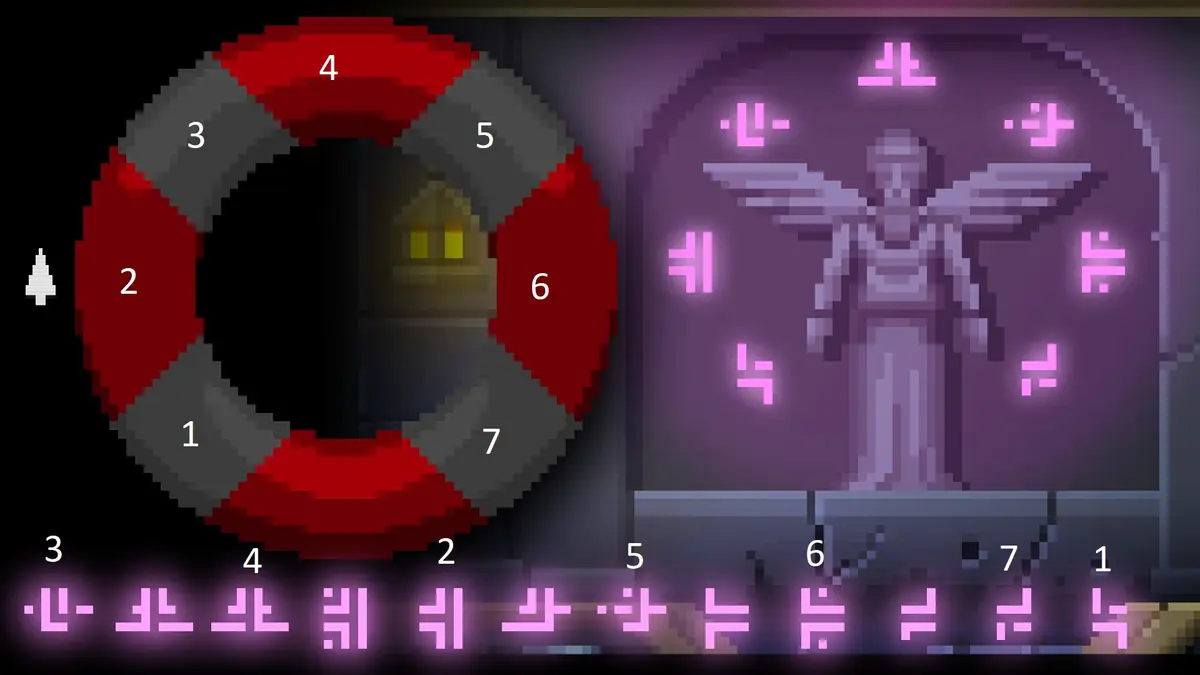
- You get the IMPROVISED PORTAL.
- Use the IMPROVISED PORTAL on Don Corpsone.
Case closed.
Christmas Episode: Buy Hard
Outside Twin Lakes Mall
- Go inside.
Mall entrance
- Go right to the escalator.
Left escalator
- Go right to the food court.
Food court
- Take a NEWSPAPER.
- Go right to the fountain.
Fountain
- Go right to the grotto.
Grotto exterior
- Go into the grotto.
Grotto interior
- Go back outside.
Grotto exterior
- Go right to the arcade.
Arcade exterior
- Try the right escalator.
- Go left to the grotto.
Grotto exterior
- Go into the grotto.
Grotto interior
- Talk to Buzz Gnome.
- Go back outside.
Grotto exterior
- Go right to the arcade.
Arcade exterior
- Ride the escalator.
The Box Office exterior
- Go left to the candy store.
Candy Land exterior
- Go left to gardening.
Ned’s Gardening exterior
- Look at Gnome Buzz.
Travel all the way right to The Box Office.
The Box Office exterior
- Examine the roof access door. It is locked.
Travel all the way left to the escalator and ride it.
Left escalator
- Go left to the mall entrance.
Mall entrance
- Talk to the security bot.
- Go right.
Left escalator
- Go up to tech.
Techstop exterior
- Go into the store.
Techstop interior
- Give the NEWSPAPER from the food court to the sports fan.
- Use the phone.
Go back to the security bot.
Mall entrance
- Talk to the security bot.
- You get the ROOF ACCESS SWIPE CARD.
Go to The Box Office exterior.
The Box Office exterior
- Use the ROOF ACCESS SWIPE CARD on the roof access door.
Mall roof
- Look at the winch or try pushing the buttons.
- Go back down.
Go into the arcade.
Arcade interior
- Look at the claw machine.
Go to Ned’s Gardening.
Ned’s Gardening interior
- Take the HAMMER beside the trowel.
Go back to the arcade.
Arcade interior
- Use the HAMMER on the claw machine.
- Take the ARCADE CLAW from the broken claw machine.
Go back to the roof.
Mall roof
- Use the ARCADE CLAW on the winch.
- Press the winch button.
Go to Candy Land.
Candy Land interior
- Take the COTTON CANDY MIX.
Go to the base of the fountain.
Fountain
- Empty the bag of COTTON CANDY MIX into the fountain.
Go back to the roof.
Mall roof
- Press the winch button.
- Grab GNOME BUZZ.
Go to the toy store.
Toy store interior
- Grab a JUMP ROPE.
- Tie up GNOME BUZZ with the JUMP ROPE.
- Place the TIED-UP GNOME BUZZ on the royal chair.
- Question him.
Go to Techstop.
Techstop interior
- Take the LAMP.
Go back to the toy store.
Toy store interior
- Place the LAMP on the tea party table.
- Turn it on.
Go to the food court.
Food court
- Talk to Norman. He refuses to sell you milk.
Go to Ned’s Gardening.
Ned’s Gardening interior
- Take the WATERING HOSE.
Go to Techstop.
Techstop interior
- Take the VACUUM CLEANER.
- Combine it with the WATERING HOSE to make the HOMEMADE PUMP.
Go to the toy store exterior.
Toy store exterior
- Use the HOMEMADE PUMP on the balcony to get the MILK-FILLED VACUUM CLEANER.
Go to the grotto.
Grotto interior
- Try to give the MILK-FILLED VACUUM CLEANER to Krampus.
- Krampus only talks to children.
Go to the arcade.
Arcade interior
- Give the MILK-FILLED VACUUM CLEANER to Emily.
- Emily won’t help.
Go to the cinema.
Cinema interior
- Get some popcorn to receive the POPCORN TUB.
Go to the base of the fountain.
Fountain
- Use the POPCORN TUB on the fountain to get the TUB OF COTTON CANDY.
Go to the arcade.
Arcade interior
- Give the TUB OF COTTON CANDY to Emily.
Go to the grotto.
Grotto interior
- Give the MILK-FILLED VACUUM CLEANER to Emily.
Go to Candy Land.
Candy Land exterior
- Talk to Rose to get the COOKIE DOUGH.
Go to the toy store.
Toy store interior
- Put the COOKIE DOUGH into the easy bake oven to receive the BAKED COOKIES.
Go back to the grotto.
Grotto interior
- Combine the MILK-FILLED VACUUM CLEANER with the BAKED COOKIES to make the MILK-SOAKED COOKIES.
- Give the MILK-SOAKED COOKIES to Emily.
- Examine the vent.
Vent
- Examine the hat to get SANTA’S HAT.
- Go right and look at the coat. You get SANTA’S COAT.
- Go right, up, right. You get SANTA’S RIGHT BOOT.
- Go right, right. You get SANTA’S TROUSERS.
- Go right, down. You get SANTA’S LEFT BOOT.
- Leave the vent. The pieces turn into SANTA’S CLOTHES.
Boiler room
- Give SANTA’S CLOTHES to Santa.
- Go back into the vent.
Grotto interior
- Get the CHRISTMAS DUST.
Go to the roof.
Mall roof
- Use the CHRISTMAS DUST on the water tank.
Go to the arcade.
Arcade exterior
- Pull the fire alarm.
Mall exterior
- Go right to the parking lot.
Go back to the grotto.
Grotto interior
- Talk to Emily.
Parking lot
- Talk to Emily.
Case closed.
Bonus Case: Polterguys
Outside Dooley’s home
- Go inside.
Living Room
- Go to the kitchen.
Kitchen
- Take the box of CHOCOLATES from the top of the fridge.
- Open the fridge to get the SAUSAGES.
- Take the SHEETS from the washing machine.
- Step through the spooky doorway.
Pantry
- Tie the SAUSAGES to the SHEETS to make the IMPROVISED ROPE.
- Use the IMPROVISED ROPE on the REMOTE to get the DEAD REMOTE.
Kitchen
- Talk to Patricia: “Dinner smells good.”
- Then ask “Hmmm… Garlic is good for chasing off unnatural things. May I take some?”
- You get the GARLIC.
- Go to the living room.
Living Room
- Talk to Buzz: “I need your JoyChild’s batteries.”
- Give the CHOCOLATES to Buzz to get the BATTERIES.
- Put the BATTERIES in the DEAD REMOTE to get the WORKING REMOTE.
- Use the WORKING REMOTE on the TV to get the EVIL VHS.
- Go to the kitchen.
Kitchen
- Combine the GARLIC with the EVIL VHS to make the RITUAL PACKAGE.
- Put the RITUAL PACKAGE in the oven to get the CLEANSED VHS.
- Go to the living room.
Living Room
- Put the CLEANSED VHS into the VCR.
Case closed.
Bonus Case: Baits Motel
Parking lot
- Open the car’s trunk to get the LUGGAGE.
- Go to the reception.
Reception area
- Tell the motel owner “We have a room booked here.” to get the ROOM KEY.
- Go back outside.
Parking lot
- Go right until you are in front of room 2.
In front of room 2
- Open the door with the ROOM KEY.
Room 2
- Put the LUGGAGE on the dresser.
- Leave the room.
Travel all the way left to the parking lot.
Parking lot
- Click the “Exit” sign behind the car.
Road
- Go left.
Attraction outside
- Go back right.
Road
- Look at the billboard truck.
- Return to the parking lot (the hotspot is to the left of Dooley’s head).
Parking lot
- Go left to the diner.
In front of diner
- Go into the diner.
Inside diner
- Ask the customer “Is that your truck out front?”
Go to the reception area.
Reception area
- Use the fax machine to get the PERMIT.
Go back to the diner.
Inside diner
- Give the PERMIT to the customer to get the TRUCK KEYS.
Go to the road.
Road
- Use the TRUCK KEYS on the billboard truck.
Attraction outside
- Clear away the sand in front of the door.
Attraction inside
- Look at the lamp in the middle of the room.
Go to the outside of motel room 3.
In front of room 3
- Talk to Genie: “So, you’re the missing genie?”
- Then ask “How would you get home?” and “A spirit quest?”
- Ask the tourist “What are some random likes and dislikes? For no reason. None at all.”
Go to the diner.
Inside diner
- Go into the kitchen.
Kitchen
- Ask the fry cook “You’re magical. What can you tell me about spirit quests?”
Go to your room.
Inside room 2
- Search the suitcase to get DOOLEY’S PROTEIN SUPPLEMENTS.
Go to the parking lot.
Parking lot
- Search the trash can to get the ENERGY DRINK.
- Mix the ENERGY DRINK with DOOLEY’S PROTEIN SUPPLEMENTS to make the SUPER SHAKE.
Go to the road.
Road
- Go right to the desert.
Desert
- Have McQueen drink the SUPER SHAKE.
- Go to the distant temple.
Temple entrance
- Go into the temple.
Inside the temple
- Walk through random doorways until the scene changes.
Temple rooftop
- Ask the wolf on the right “Where is this place?”
- Look at the bench.
- You get the COSMIC STAMPS.
Go to the attraction.
Attraction inside
- Use the COSMIC STAMPS on the lamp.
Go to the reception.
Reception area
- Go into the laundry.
Laundry
- Take the COAT HANGER and the DETERGENT.
Go to the road.
Road
- Climb the ladder.
Top of the ladder
- Attach the COAT HANGER to the antenna.
Go to room 3.
In front of room 3
- Look through the window.
- Go to room 2.
In front of room 2
- Get CHEESY PUFFS from the vending machine.
Go to the diner.
Diner
- Go behind the diner (left side).
Backside of the diner
- Try to give the CHEESY PUFFS to the rat.
Go to the laundry.
Laundry
- Grab the LAUNDRY BASKET from the tumble dryer.
- Combine the CHEESY PUFFS with the LAUNDRY BASKET to make the RAT TRAP.
Go behind the diner.
Backside of the diner
- Use the RAT TRAP on the rat to get the RAT.
- Stick the RAT into the vent.
Go to the kitchen.
Kitchen
- Grab the YEAST and the SYRUP from the shelf.
- Combine the DETERGENT with the YEAST to make the SUDS MIX.
Go to room 3.
In front of room 3
- Listen to Otto waste a wish.
Go behind the diner.
Backside of the diner
- Search the old car to get the CROSS WRENCH.
Travel all the way past room 3.
Swimming pool
- Go into the utility room.
Utility room
- Open the circuit breaker with the CROSS WRENCH.
- Turn off the air conditioning.
Go to room 3.
In front of room 3
- Try to open the door.
Go to the attraction.
Attraction inside
- Grab the bird skeleton to get the BIRD BONES.
Go to room 3.
In front of room 3
- Open the door with the BIRD BONES.
Inside room 3
- Pick up the FISHING ROD.
- Look at the tourist’s clothes.
Go to the desert.
Desert
- Combine the FISHING ROD with the SYRUP to make the SYRUP’D ROD.
- Use the SYRUP’D ROD on the anthill to get the ANTS.
Go to room 3.
Inside room 3
- Use the ANTS on the tourist’s clothes.
Go to the laundry.
Laundry
- Put the SUDS MIX into the washing machines.
Go to the swimming pool, then to room 1.
In front of room 1
- Talk to the carny to get the MYSTERY SACK.
Go to the swimming pool.
Swimming pool
- Throw the MYSTERY SACK at the tourist.
Case closed.