Unlock all achievements in Burn With Me with Hardmode strategies and tips for each chapter and the finale.
Burn With Me: 100% Achievement Guide
General Information
If you are new, play a little first to learn the core mechanics. Cards are named here without their full text to keep things short. You can read every card’s description in the Bestiary achievements section below or in the in-game Bestiary.
The Hardmode strategies assume you keep a lean deck:
- Pick and keep only good cards that fit the strengths of your chosen strategy.
- Taking other cards now and then is fine, but get rid of them with the game’s burning mechanics.
Play in Normal mode for each chapter’s special achievement.
You can save and load during a run. Loading takes you back to the start of the last round you played before quitting, at the card selection phase. Card positions and burn order change when you reload, so you can try to steer the RNG this way, but it is not reliable.
The sections below contain spoilers.
Story Achievements
You earn these by finishing each chapter:
- Lessons Learned: complete the Introduction
- Alan’s Story: complete Chapter 1
- Tong’s Story: complete Chapter 2
- Erra’s Story: complete Chapter 3
- Nita’s Story: complete Chapter 4
- Stonewall Jr’s Story: complete Chapter 5
Finishing Chapter 6 / Finale gives two secret achievements. Clear spoilers follow.
- INTERTWINED: beat Chapter 6 / Finale (reach the required score in the final encounter) with every student card still in your deck. Each one must sit on its designated spot in the final encounter.
- BAD COLLECTOR: beat Chapter 6 / Finale while missing at least one student card. Burn at least one before the final encounter, so at least one designated spot is still empty when you win.
Each chapter’s Hardmode and special achievement have their own section below.
Chapter 1
Alan’s Demon (Hardmode)
Score targets:
- Part 1: 9 → 13 → 18 → 22 → 26 → 30
- Part 2: 33 → 36 → 39 → 43 → 46 → 49
- Personal Demon: 55 → 65
You need Gallus or Vulpes to keep your deck from bloating. Gallus is usually the stronger pick:
- Play Gallus first to choose which card burns, or to burn nothing at all.
- Gallus also scores the card it burns. Compare Gallus [6] base + burned card [X] base with Vulpes [10] base. The result is usually close, and Gallus wins in combos such as Lacerta: play Lacerta on an empty field, then Gallus right after so nothing else burns.
- Generally good cards: Rana (solid points, works with almost every strategy), Lacerta (high points, keeps the deck lean, combos with Neglesimon)
- Cards to avoid: Coma and Muris (a lean deck doesn’t need extra draws, and their flat base values are low)
Every other card depends on your strategy.
Scaling strategy
Build around Octopod plus either [Gados + Blobus] or [Lacerta + Neglesimon]. Ranas always help and make it easy to switch to the Vipera strategy. Any card that adds solid points is useful.
Vipera strategy
You need at least 2 copies of Vipera and cards with [4] base points. From best to worst: Rana, Lupus, Lasius.
Tip: Early on, Octopod can raise other cards to [4] base, so both strategies stay open until Vipera shows up. If it never does, switch to the scaling strategy. If it does, get rid of Octopod.
Big bite
Score 20 points with a single card. Three ways to do it:
- Use the Vipera strategy above. Play Vipera as your fifth card, after four cards with [4] base, and it scores 24.
- Use Octopod(s) with either Blobus or Lacerta and Neglesimon.
- Use Coma + 1–2x Muris + 1–2x Octopod. Skip burning cards and burn through drawing instead.
Chapter 2
Tong’s Demon (Hardmode)
Score targets:
- Part 1: 10 → 13 → 17 → 22 → 26 → 31
- Part 2: 35 → 39 → 43 → 47 → 51 → 55
- Personal Demon: 250
Things to know:
- You lose hand slots as the run goes on. That makes Cantarina a great card: it helps you find what you need at the right moment and works with every strategy.
- The Personal Demon fight lasts 5 turns. Each turn, one card gets stuck in the corner covered by the web. You can burn the webbed card to free that slot for a while (it gets webbed again) and play one extra card.
You have to scale your cards to beat the Personal Demon. There are three main strategies, from best to worst.
Vampire into big base cards
Grab Vampire as early as you can, then let it consume Gekka, Pauper, Ferrilata or Vindexa. It scales very hard and can win the chapter on its own if you pick it early enough, since high-base cards usually show up often.
Scriba eats
This works like the Vampire plan but has weaker synergy overall. You can’t use Gekka properly, and sometimes not Ferrilata either. In the final encounter, take care not to burn low-base cards by accident if your deck is already small, as it should be. On the plus side, you can focus less on high-base cards, though you still need them to finish the chapter.
Reshuffling Pavo
You need 1–2x Pavo and 2–3x Cantarina. Play Cantarina, scale Pavo, and repeat as often as you can. Take Muris only if nothing better is offered; it is not a good card for this chapter in general. This plan scores well but depends heavily on RNG, since you need Pavo fairly early and several Cantarina on top of that.
Fast trek
Beat the Personal Demon in three turns. Any of the strategies above works in Normal mode, in the same order of preference.
Chapter 3
Erra’s Demon (Hardmode)
Score targets:
- Part 1: 10 → 13 → 17 → 23 → 28 → 33
- Part 2: 37 → 42 → 47 → 52 → 57 → 62
- Personal Demon: 230 or 115
Things to know:
- This chapter needs three things: permanent scaling (Phoenix/Sus), mass burning (Magister/Vulpes), and extra card pushes in the final encounter (Magister/Dardana/Cervus).
- The Personal Demon fight has a special feature. Once you have 20 cards burned, the hammer behind the glass becomes usable. Click it to shatter the Demon’s vessel and cut the required score in half.
About the encounter in the middle of the chapter:
- You lose it by design, and that helps you: scale your cards without worrying about the score. Play Sus and burn Phoenix if you can.
- Your sanity resets to zero when it ends, so there is no reason to overscore in the first half of the chapter.
- At the end, you get one Murder of Crows card for each empty slot in your hand. This also favors burning/Phoenix decks, since the intermission gives you an additional Murder of Crows to burn later.
Phoenix x2 + Magister is the strongest core. It gives good point gains and moves you toward the Personal Demon’s score reduction by burning “for free”. Sus gives a similar points progression (fewer points, but more reliable) without the burning, so your deck has to make up for that, for example with Bellus.
Magister only appears in the second half of the chapter. Phoenix, on the other hand, should be picked as early as possible and burned as often as possible. Without Magister, that means you can’t score Phoenix’s points. So use Vulpes to burn Phoenix, and make up the lost score with these cards:
- Turtur + Gados: Turtur has a low base and boosts another card for a while; Gados collects the difference.
- Cervus: a great card overall. Early on, one copy fixes a points shortage. Near the end, stack as many as you can: they add free points without taking up space.
- Bellus: the weakest of the three, but it does the job and needs no setup. Its Useless Guards should help with the Personal Demon gimmick in theory, yet Murder of Crows and Phoenix+Magister usually give you enough burning anyway. If you roll only one Phoenix, Bellus is a good source of extra burns.
Dardana shines in the Personal Demon fight. If you couldn’t scale Phoenix/Sus enough, you need either Dardana or Magister. Rolling Dardana close to the Personal Demon can be hard. You don’t need it during the run, since you will score enough without it, so just hold on to it until the final encounter.
Determination
Beat the Personal Demon without breaking the vessel. In Normal mode, that means scoring 130 points. Since you don’t need mass burning here, Bellus loses value and the Sus + Turtur + Gados plan becomes the better choice. Dardana is essential for the final encounter.
Chapter 4
Nita’s Demon (Hardmode)
Score targets (bold rounds need a low score):
- Part 1: 11 → 13 → 16 → 21 → 25 → 31
- Part 2: 33 → 15 → 45 → 7 → 57 → 0
- Personal Demon: no score needed
Things to know:
- Your first card selection is always Refissora, Glacia and Remedis.
- Your deck has to hit both high and low scores in the second part of the chapter.
- Hippscur is not available in this chapter’s Hardmode.
- The Personal Demon fight burns all your cards and needs no points.
You can approach this chapter in several ways. The method below is the most reliable one and works almost every time:
- Take Refissora as your first card.
- Hold on to your starting cards, especially Shadow [2], for as long as you can.
- For high scores: Pondero.
- For low scores: a second Refissora and Laxobi.
- For flexibility: Nuxer (it works with Shadow [2] and Pondero) and Ducat, ideally two of each.
- Verminger is situational. You may need it if you don’t get extra Nuxer/Ducat, or if your deck doesn’t fit the round that needs 57 points.
Example plays:
- 57-point round: Nuxer (16) → Ducat (no neighbours, 10) → Nuxer (12) → Pondero (between the two Nuxers, 17) → Refissora. You can play the Nuxers in a different order depending on your last card.
- 0-point round: Shadow (1–2) → Shadow (1–2) → Laxobi (sets the score to 0) → Refissora → Refissora.
With this approach, you can safely skip Remedis, Camelia, Bucci, Glacia, Erina and Swarm of flies.
I am bad at math
Finish Chapter 4 without a single perfect turn. Score targets in Normal mode:
- Part 1: 11 → 13 → 16 → 20 → 22 → 25
- Part 2: 30 → 20 → 36 → 20 → 42 → 15
- Personal Demon: no score listed
Despite the name, you need to be good at math for this one. It changes your approach more than any other chapter challenge, but Normal mode doesn’t have the extreme high/low scores and swings of Hardmode. Take Remedis as your first card. Camelia becomes the main scaling card.
Watch the second turn. Your first turn must be imperfect, which leaves you with only 2 spare sanity points for the second. That turn must also be imperfect, so you can only score between 11 and 15, excluding 13. After that, Remedis can always refill your sanity vessel.
Chapter 5
Stonewall Jr’s Demon (Hardmode)
Score targets:
- Part 1: 10 → 13 → 17 → 25 → 30 → 35
- Part 2: 40 → 44 → 48 → 52 → 56 → 60
- Personal Demon: 70 → 60 → 80
Things to know:
- Rolling a 1 gives you a random Bad Devil, and rolling a 6 gives you a random Good Devil. The Devil goes to your hand if there is room, or into your deck if your hand is full. Devils have 0 base points (this can be modified) and burn when played. Depending on the situation, some Bad Devils can actually help (see below).
- The Personal Demon fight has 3 stages: stage 1 rolls random dice, stage 2 rolls 1s, and stage 3 rolls 6s. Cards that change rolls, such as Defectus, override these.
- Hardmode has no scaling cards in this chapter: no Ornito, Lucky Rana or Cochlea.
Bad Devils
- #1: Burn both neighbors. Useful for burning junk or Lucky Phoenix.
- #2: Set the base points of a random card in hand to 0 until the end of the turn.
- #3: -1 to both neighbors.
- #4: Return a random card from your hand to the deck.
- #5: Empty the sanity vessel.
- #6: -5 points to the score. It can’t push the score below 0.
- #7: Put a Useless Guard into the deck.
Good Devils
- #1: +1 to both neighbors.
- #2: Draw 1 card.
- #3: +10 to a random card in hand until the end of the turn. It can buff Devils too. Combine it with a card, then feed that card to Imitor.
- #4: +10 points to the score.
- #5: Copy a random card from your full deck.
- #6: Put a random card from the field into the deck.
- #7: Redraw your full hand.
- #8: Refill the sanity vessel.
This chapter relies a lot on RNG. That doesn’t make it especially hard, but there is no single fixed strategy, so here are the general approaches.
- Good cards: Defectus in the early game (Devils stop being a problem and can even help), Lucky Phoenix, Imitor to feed on two of these, Ekorra, Laurus, Fenneca, Lotor (especially if you have Defectus).
- Situational cards: Ludius if nothing better is offered; Ambystoma (it sets up Fenneca, but also competes with it for rolled 6s); Tissa (it lets you play another card but often breaks Imitor setups, and becomes very strong if Imitor buffs its base value).
- Cards to avoid: Lucky Ursus (it’s OK, since two Bad Devils burn it easily, but Ekorra beats it in every way), Bufo.
A solid run usually goes like this:
- Pick Ludius or Defectus early so you don’t have to worry about scoring.
- Keep a couple of Lucky Phoenix cards and burn them until their base is good.
- Feed one Lucky Phoenix to Imitor, then burn the “donor” Lucky Phoenix again to restore its base.
- Have the buffed Imitor donate its base to Laurus/Fenneca/Tissa/Lotor, then donate Lucky Phoenix’s score to Imitor again.
- Roll 6s with Laurus or Defectus+Lotor for a big score boost through Ekorra or Fenneca.
Devils are key, so try to trigger as many Good Devils as you can. If you know you will go over the score anyway, play Laurus to guarantee a Good Devil. Lotor after Defectus works the same way.
Rollercoaster
In one turn, gain 10 sanity, spend all of it, then fill the sanity vessel again.
Use Bad Devil #5 (“Empty sanity vessel”), Good Devil #8 (“Refill sanity vessel”), Fenneca and Ambystoma. You can collect several of those Devils and play them back to back, alternate Fenneca/Ambystoma/Fenneca in phase 3 of the final encounter (when 6s are rolled), or mix both methods.
Finale (Chapter 6)
Teacher’s Demon (Hardmode)
Score targets by student:
- Alan: 20 → 23 → 27 → 30
- Tong: 40 → 47 → 54 → 60
- Erra: 70 → 77 → 84 → 90
- Nita: 100 → 107 → 114 → 120
- Stonewall Jr.: 130 → 137 → 144 → 150
- Reesa: 400
Special modifiers can appear on the corners of the field. A modifier only affects the first card placed on that corner each turn. If you burn a card played on a modified corner, the slot loses its modifier. The full list:
- -1/-2/+1/+2 permanent base
- Burning modifier
- Temporary 1/2 modifier: halves the card’s total score, special abilities included, for this turn only (rounds up)
- Duplicate: puts an Amalgam card with the same base points as the played card into your deck
- Special effect nullifier
- Return the card to the deck
Other things to know:
- At most one burning corner and/or one duplicate corner can appear on the field per turn.
- Card base values grow with each part of the chapter: +2 base for each option after every student card. For example, Gados has 5 base points before Tong, 7 before Erra, then 9, 11 and 13.
- Near the end of the chapter, especially after Stonewall Jr., base values matter far more than special abilities. In the late game, take the highest-base cards on offer whatever their effects, and don’t burn them. Fatuum is the classic trap: if you get it late, don’t play it. Its base points (13) are worth more than playing or burning it for +10 with Alan #1, or +5 with Alan #2 (not even guaranteed), in the final encounter.
- Using duplicate corners with your highest-base card and keeping the Amalgam alive is crucial. Metior pulls the card you need. Neglesimon, Salvator or, more often, a special effect nullifier corner keeps Amalgams alive.
Two main approaches shape your deck: Alan #1 into a big deck, or Alan #2 into a lean deck. On average, the first is more reliable.
Erra #2, Nita #1 and Stonewall Jr. #2 are good picks whichever Alan you choose:
- Erra #2: clears burning corners for Alan #1 and is a must-have for Alan #2, ideally paired with Gallus. Erra #1 is harder to play and scales down quickly. Neither version of Erra buffs Alan #1.
- Nita #1: the better card, as long as you avoid keeping your sanity vessel full.
- Stonewall Jr. #2: the other version has no synergy with Alan #1 at all. For Alan #2, see the late-game burning note above. In the final battle, compare [30] base Stonewall Jr. + [70] base Amalgam (100 points total) with [10] base Stonewall Jr. + [35] from donating the same Amalgam to it (45 points total, and only if Stonewall Jr. burns the right card). Some RNG cases make Stonewall Jr. #1 the better pick, but don’t count on them.
Alan #1
- Cards to look for: Tong #1 (finding cards matters more with this Alan), Metior (summons Alan or his Amalgams), Cantarina, Gados, Imitor (the most overpowered combo in the game: it takes Alan’s points while Alan keeps his own), Neglesimon (stops Amalgams from burning), Fatuum and Bellus if it’s not the late game (free points for Alan)
- Cards to avoid: anything that burns
Negative point modifiers (-1/-2) only affect Alan #1 at the moment he is played. Right after, his base goes back to [deck size]x2. Use him to clear those corners, and don’t play him on +1/+2 corners, since they would be wasted.
Metior is the key card. Your deck will grow to 50 cards, so the more Metiors you have, the better your odds of pulling Alan, who can clear almost any encounter by himself. Cantarina is the backup plan.
Play Alan before you burn cards.
Alan #2
- Cards to look for: Tong #2 (see below); anything that burns, especially Gallus; Gados, Gemma, Dardana; Neglesimon or Salvator (they can save Amalgams in a pinch, but burn them if you need to); Fatuum if it’s not the late game.
- Cards to avoid: nothing really, since you will burn most of your deck anyway. Just don’t take too much burning: keep a bit of spare junk in the deck for surprise burning corners.
Why Tong #2? This strategy doesn’t lean on specific cards, and its core setup is done before Tong joins your deck. You will burn nearly everything, so always take the third (“blind”) option unless Gemma, or perhaps Dardana if you need it, is one of the “open” options. For example, if the open options are Rana and Neglesimon, it doesn’t matter which one you take, because both will burn. The blind option, though, might hide the Gemma you’ve been waiting for.
If you get Gallus + Gados in the first part of the chapter (before Tong), your run is in good shape. If not, fish for them with Tong #1, or restart the chapter unless you want a challenge.
Play Alan after you burn cards.
Bestiary Achievements
Every card you meet in a run is added to your Bestiary with a white frame. When you win a run, every card picked during it gets a golden frame instead, even if it was burned later and isn’t in your final deck. A golden frame unlocks an alternate art face for the card; click the card in the Bestiary menu to choose which face you see in the game. Bestiary achievements need every related card in golden frame.
Alan’s Bestiary: every Chapter 1 card has a golden frame.
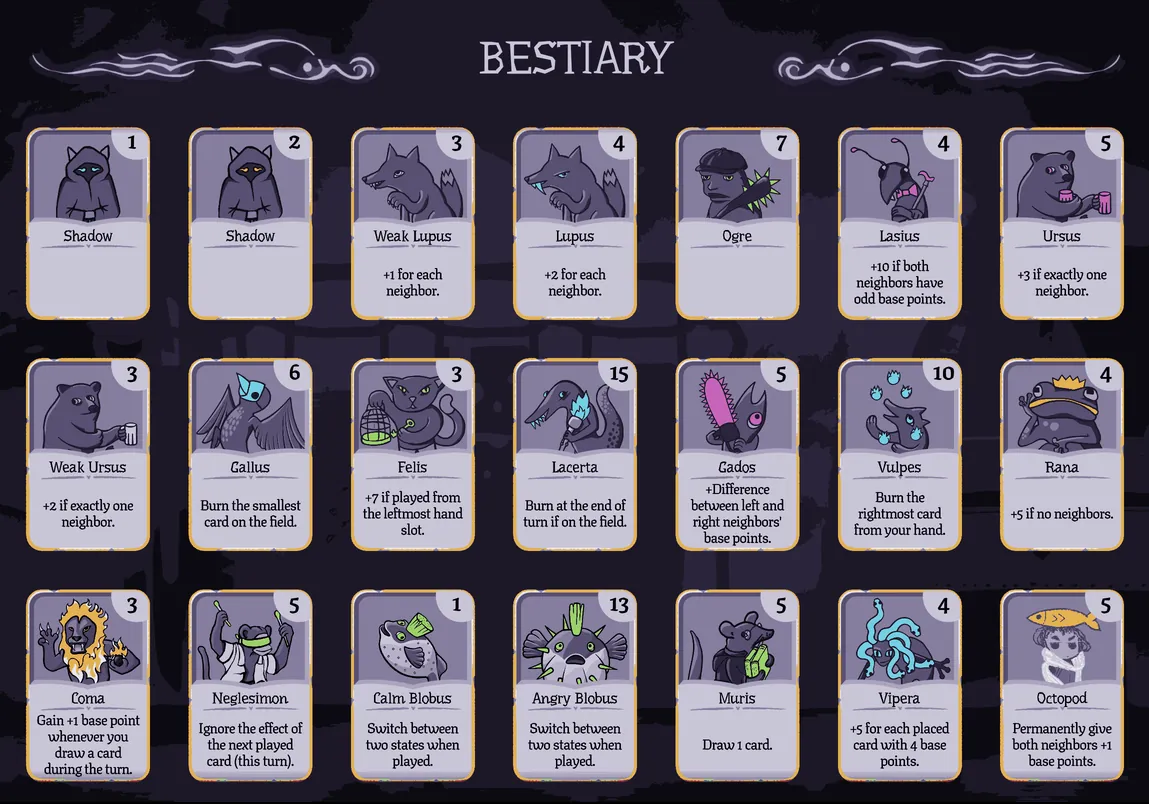
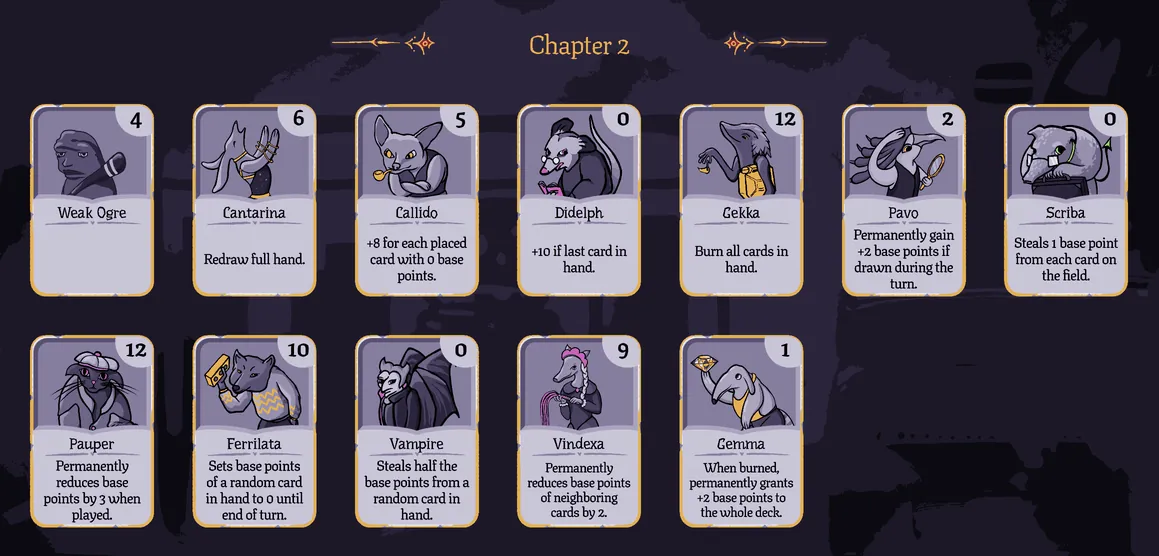
Tong’s Bestiary: every Chapter 2 card has a golden frame.
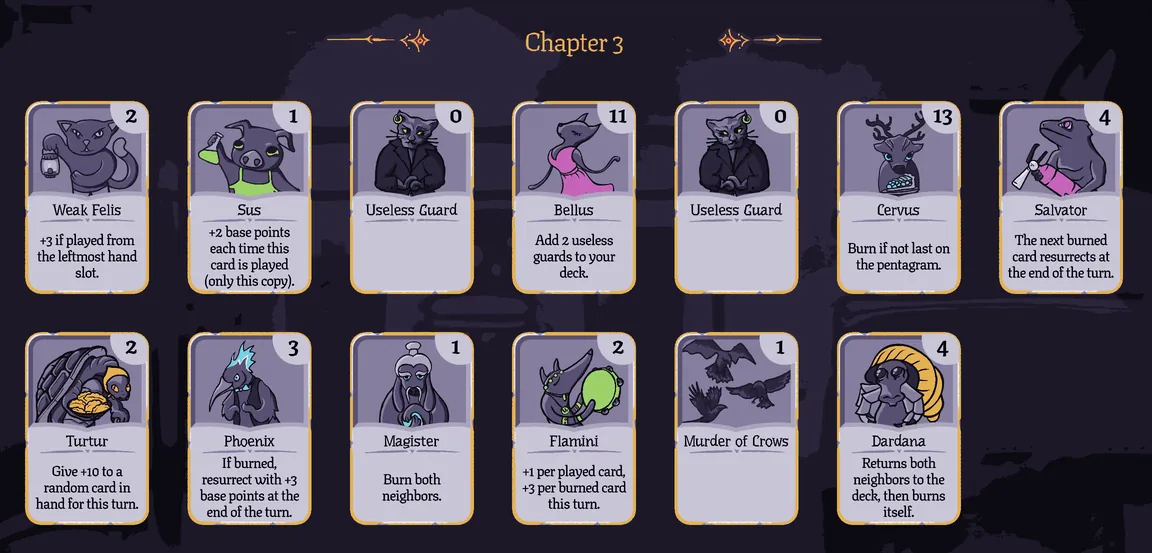
Erra’s Bestiary: every Chapter 3 card has a golden frame.
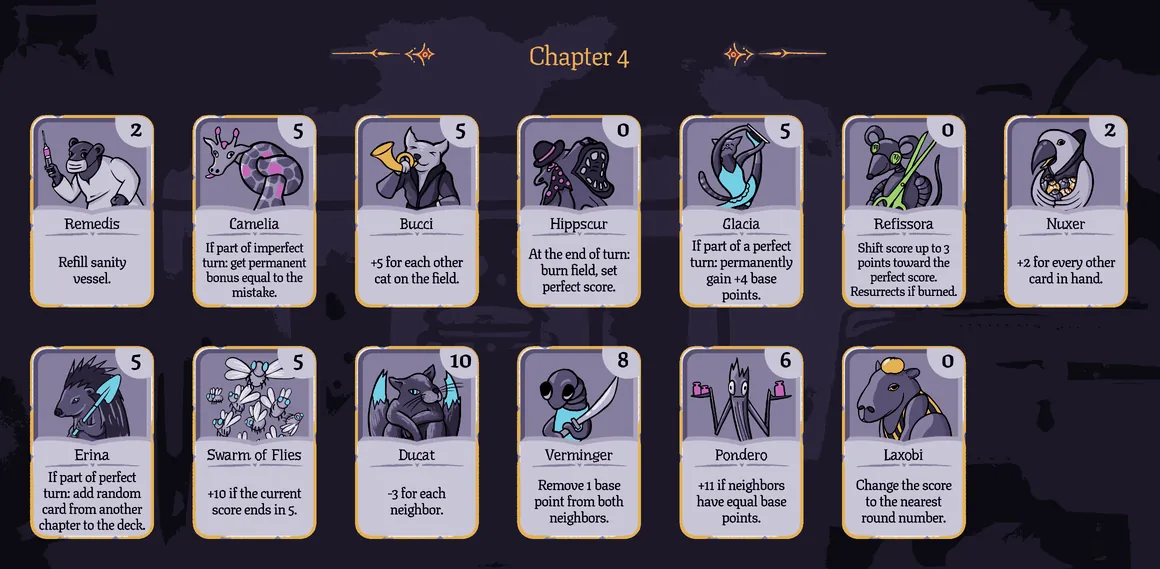
Nita’s Bestiary: every Chapter 4 card has a golden frame. Hippscur can’t be obtained in this chapter’s Hardmode.
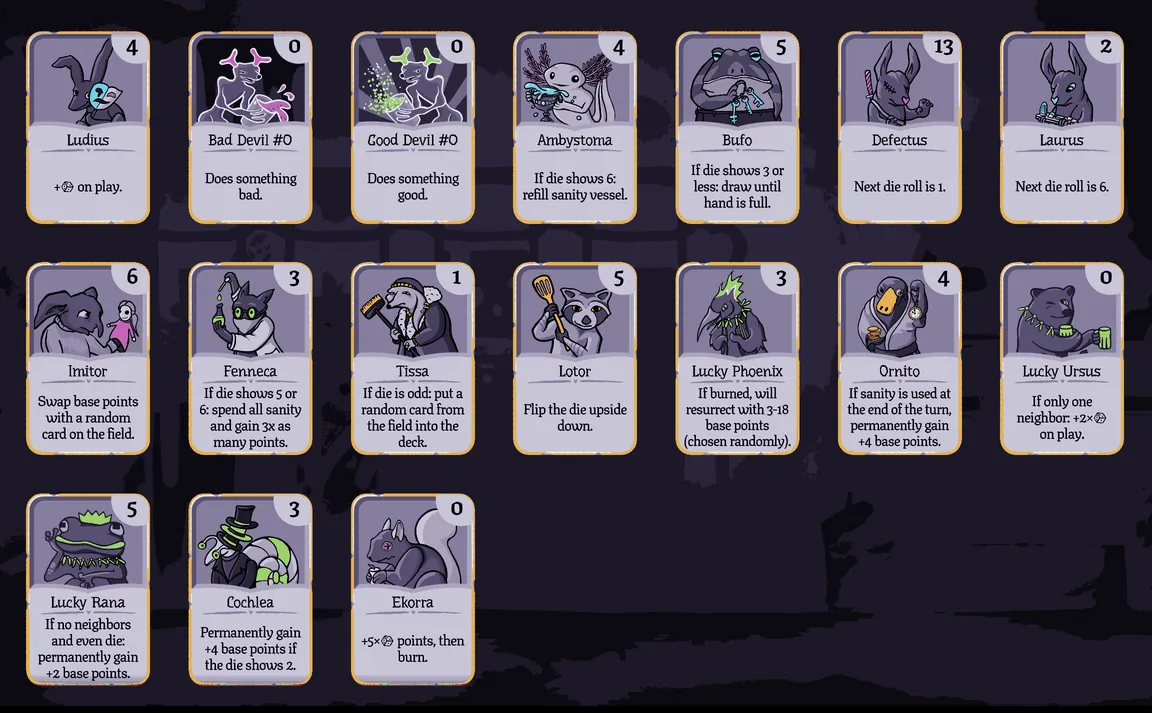
Stonewall Jr’s Bestiary: every Chapter 5 card has a golden frame. Ornito, Lucky Rana and Cochlea can’t be obtained in this chapter’s Hardmode.
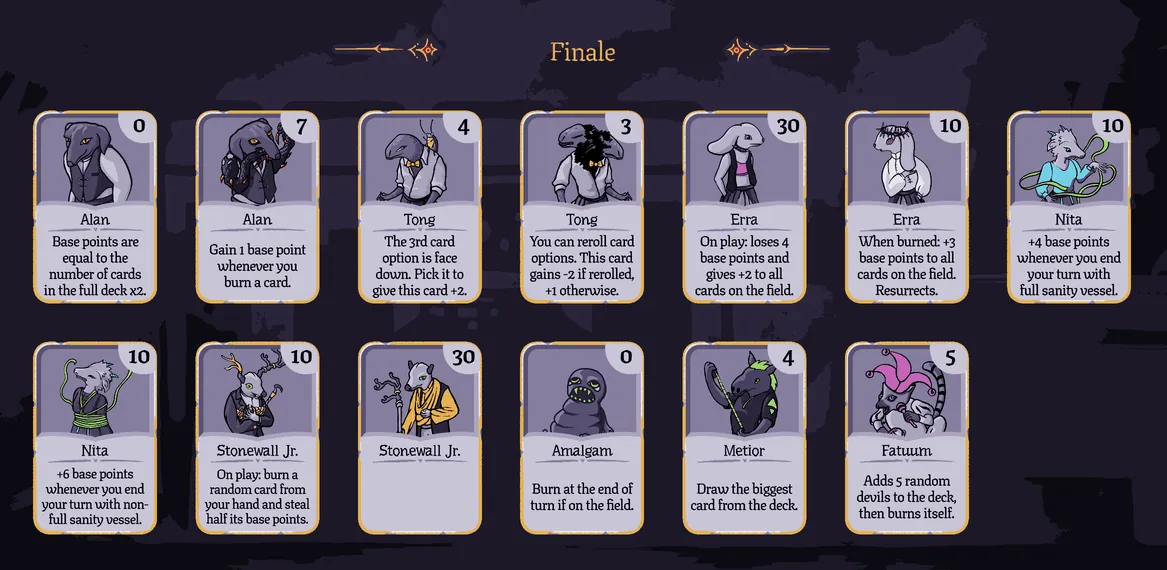
Teacher’s Bestiary: every Finale/Chapter 6 card has a golden frame.
Full Bestiary: every card has a golden frame.
Other Achievements
Unconventional burning
Burn a card by dropping its score below 0.
Empty-handed
Have fewer than 5 cards on the field while no cards are left in your deck or hand.
All in
Play 11 cards in one turn. It’s easiest in Chapter 5, especially in the final encounter, using Devil cards.
They grow fast
Raise any card to 50 base points. It’s easiest with either Alan in Chapter 6.
Fatalist
Finish any chapter without pressing the “draw card” button. Drawing (and burning) by other means is fine.
Chapter 1 is the easiest place for it if you follow the lean-deck rule and draft decent cards. Getting Gallus or Vulpes in one of your first two turns isn’t required, but it makes this trivial. After that, burn one card per turn so your deck never goes above 7 cards. You will never need to draw, and won’t even get the chance. See the Chapter 1 Hardmode strategies for recommended cards.
Tip: If you’re going for 100%, get Fatalist together with Firefighter in Chapter 1 (see below).
Firefighter
Finish any chapter without burning a single card. This also means you can’t draw, because drawing burns a card already in your hand. It’s tricky and depends on RNG, so you may need to restart or save-load several times.
In Chapter 1, ideally roll only [4] base cards and Viperas. Otherwise, a typical successful run uses some mix of:
- 1–2x Rana across the run (use Octopod to buff it to an odd base value for Lasius)
- Octopod, if you get it early, to buff the starting cards to [4] and later Rana/other cards to odd values
- Muris as a backup and an odd-based card
- Lupus for a solid mid-game gain
- 1–2x Ursus
- 2x Lasius for the end game. These do the real scoring; the other cards are buffed to odd (and ideally bigger) values to support them.
If you get the chance to switch to Viperas at any point, do it. Keep that option open for as long as you can, for example by not buffing Rana to [4] base.
Build up sanity during the run so you can spend it in the Personal Demon fight.